Plantbot - building a plant-sustaining robot with Pictorus
In this post we’ll go over the design of a small plant sustaining robot - featuring a simple watering system that activates based on soil moisture levels. And just for fun, we'll mount the plant to a rover that drives around seeking out optimum lighting for our plant, because we can. We’ll run the sensing and controls from a Pictorus app, deployed wirelessly to a Raspberry Pi Zero.
In addition to a Raspberry Pi Zero, here are the components we’ll be using:
- Capacitive moisture sensor
- Ambient light sensor
- Analog to Digital Converter (ADC)
- Water pump (with MOSFET)
- Repurposed robot chassis and motor drivers (we used this one)
Light Sensing Bot
We decided to repurpose an mBot Mega wheeled robot we had laying around the lab for our Plantbot prototype, salvaging some usable components - primarily the frame, motors + wheels, and motor drivers. After removing all other components and its custom board, we can hook up the motor drivers to a Raspberry Pi Zero and start controlling the rover from an app we develop in our browser. Check out our blog post about how to sync a Pi with Pictorus to develop and deploy apps to it.
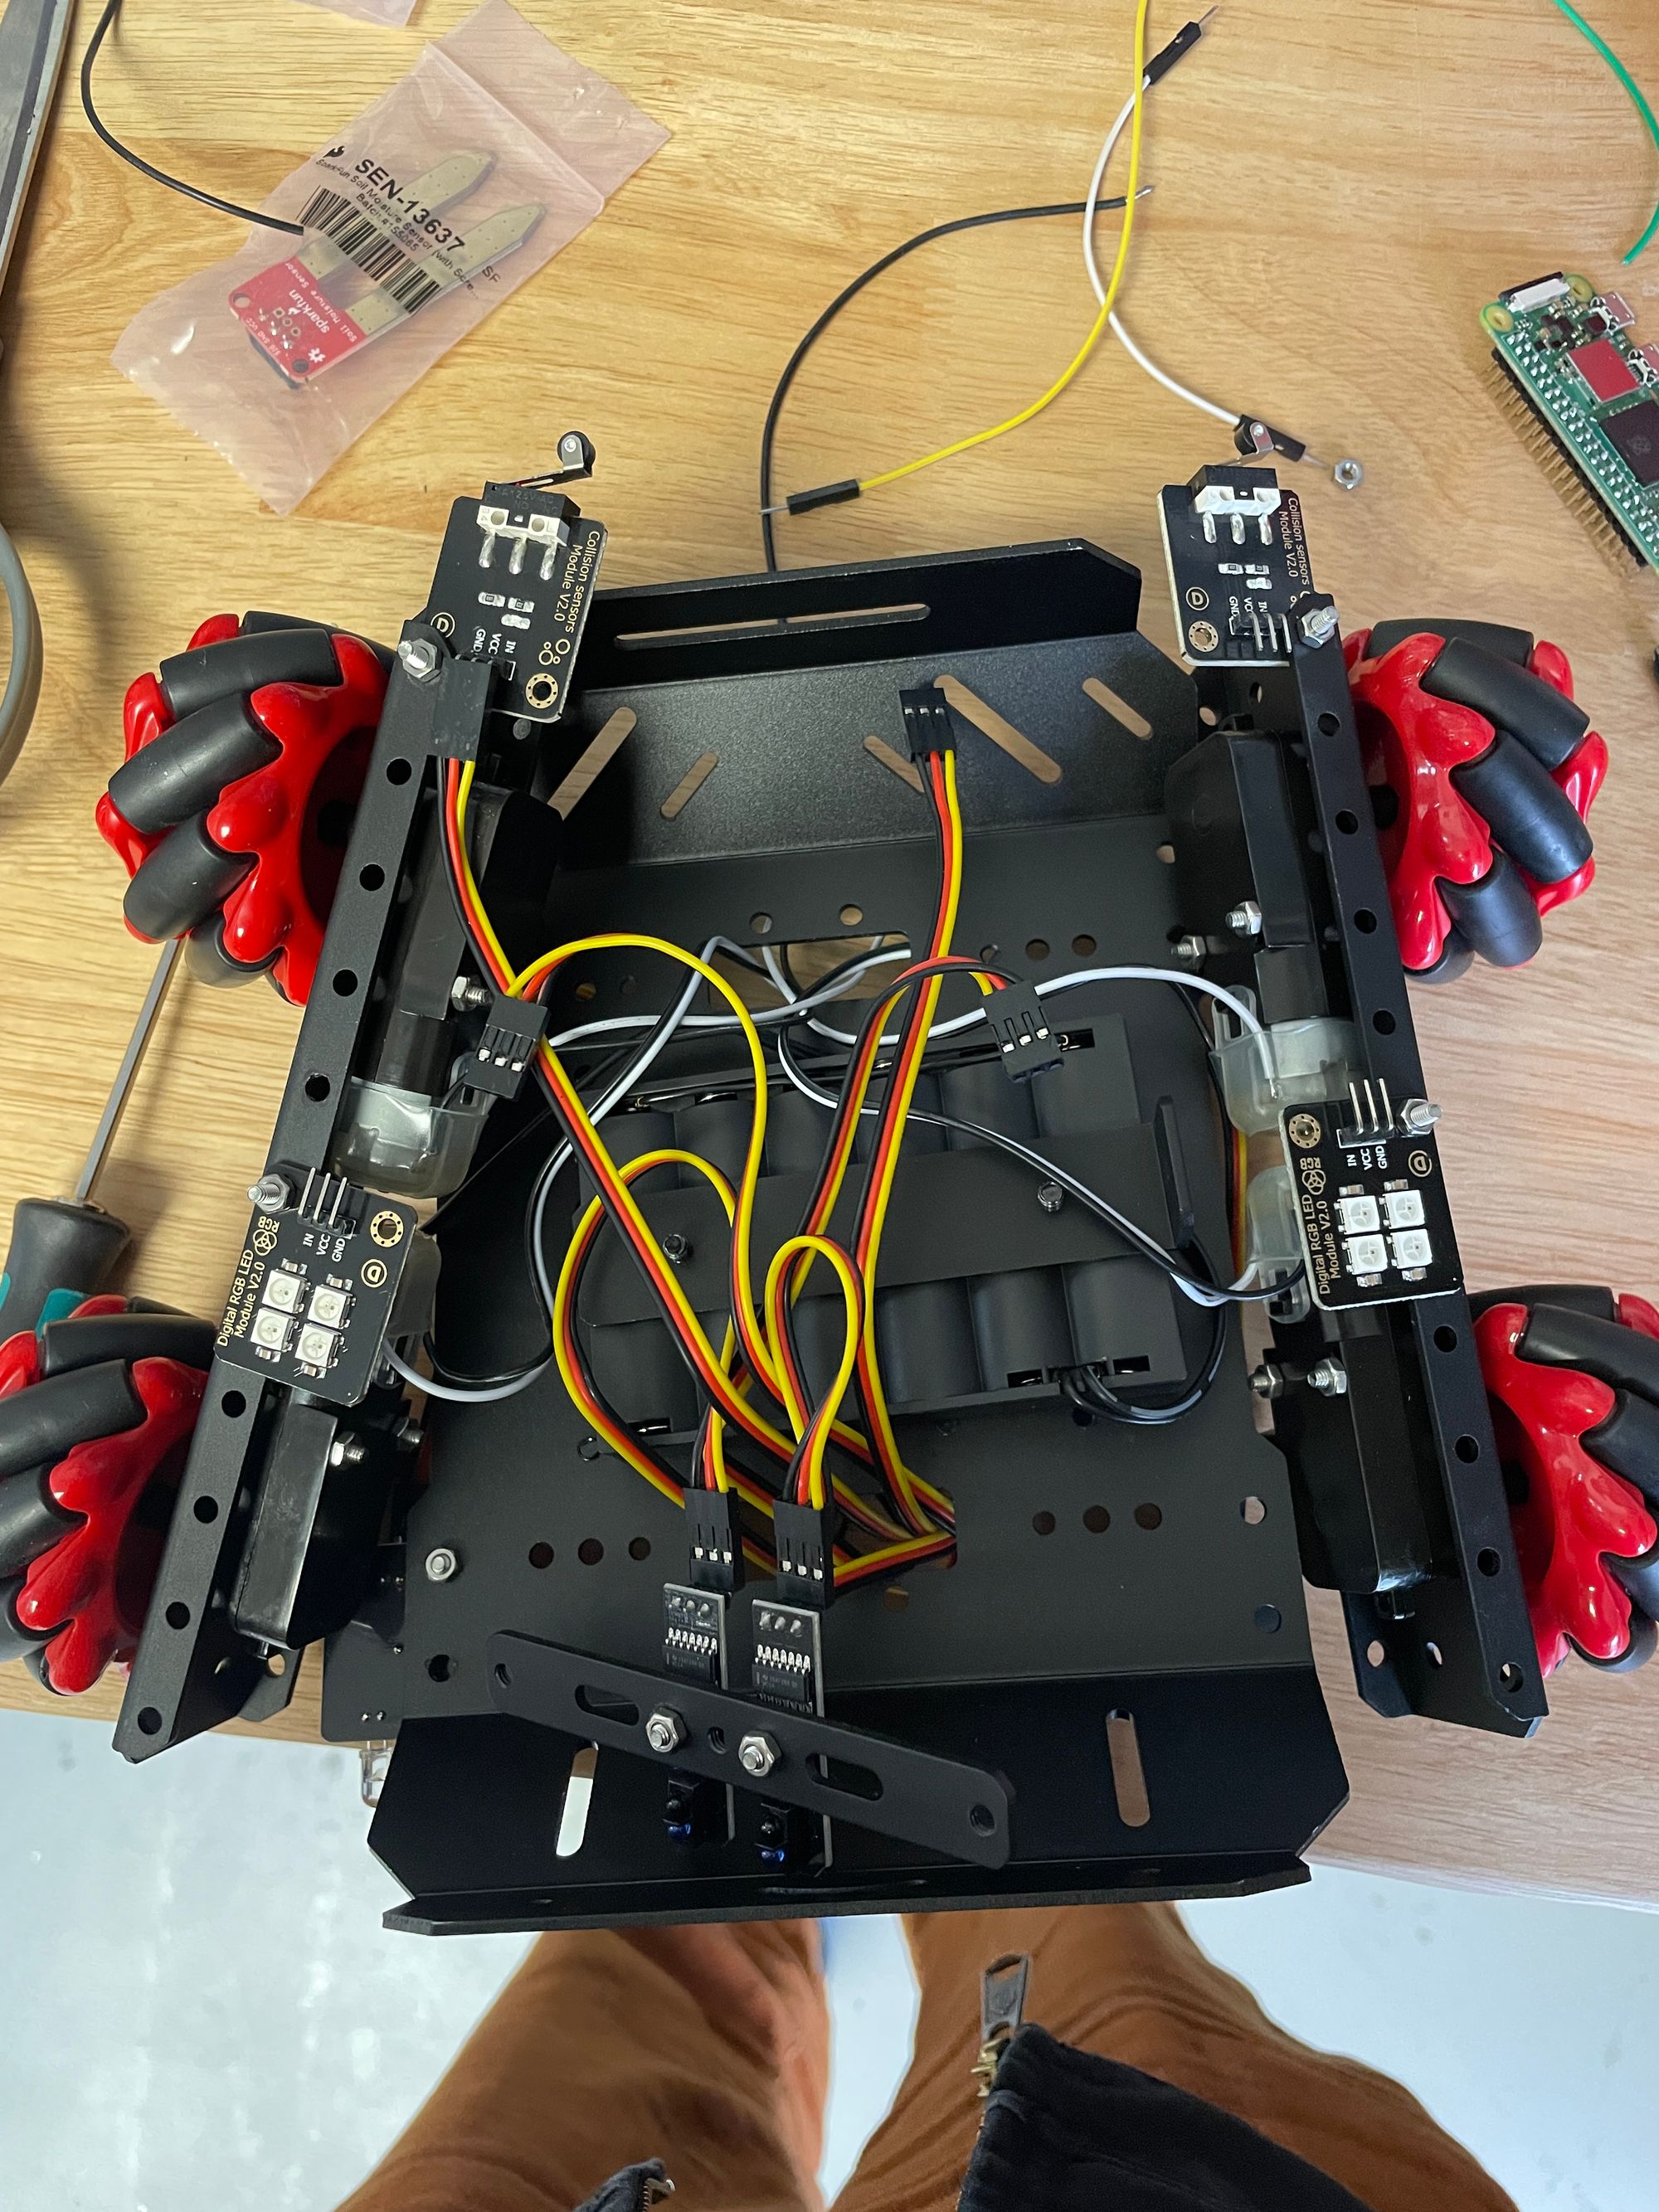
From our app editor in browser, we can use MotorController components to send a direction and speed to each of the DC motors - to simplify our design, we are controlling the left and right wheels in pairs.
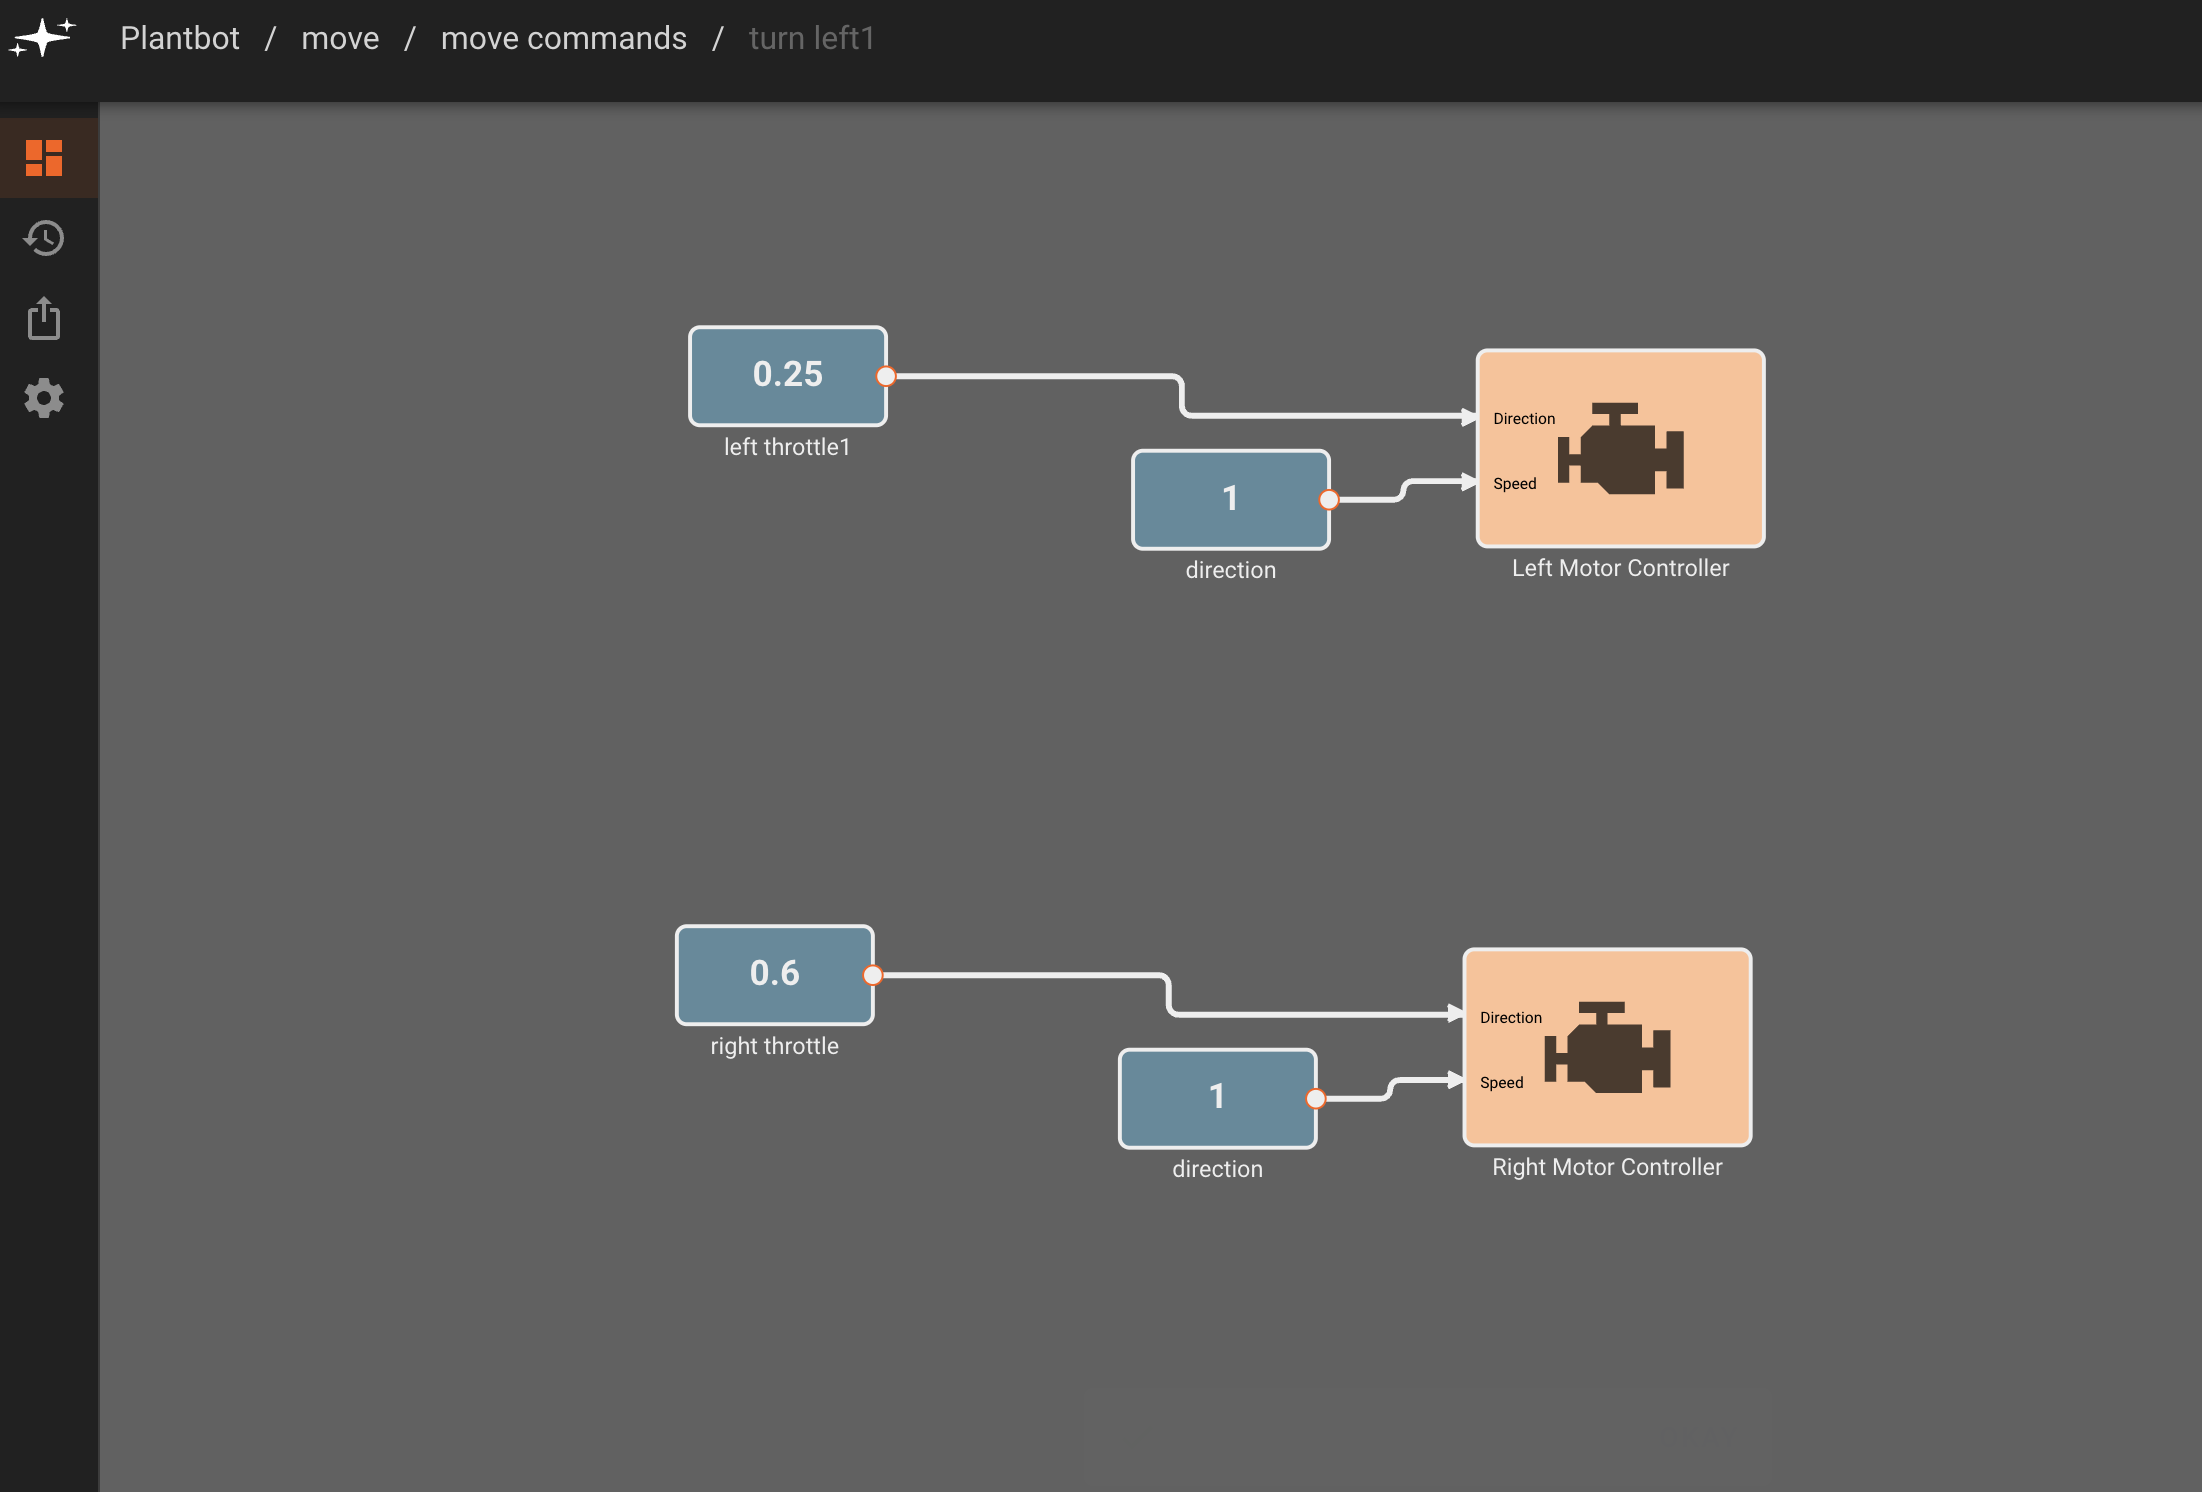
Once we’ve figured out basic steering commands (turn left, turn right, go forward) with the existing wheels - we can move on to reading ambient light levels that will eventually control the direction our robot steers.
Steering Plantbot toward light
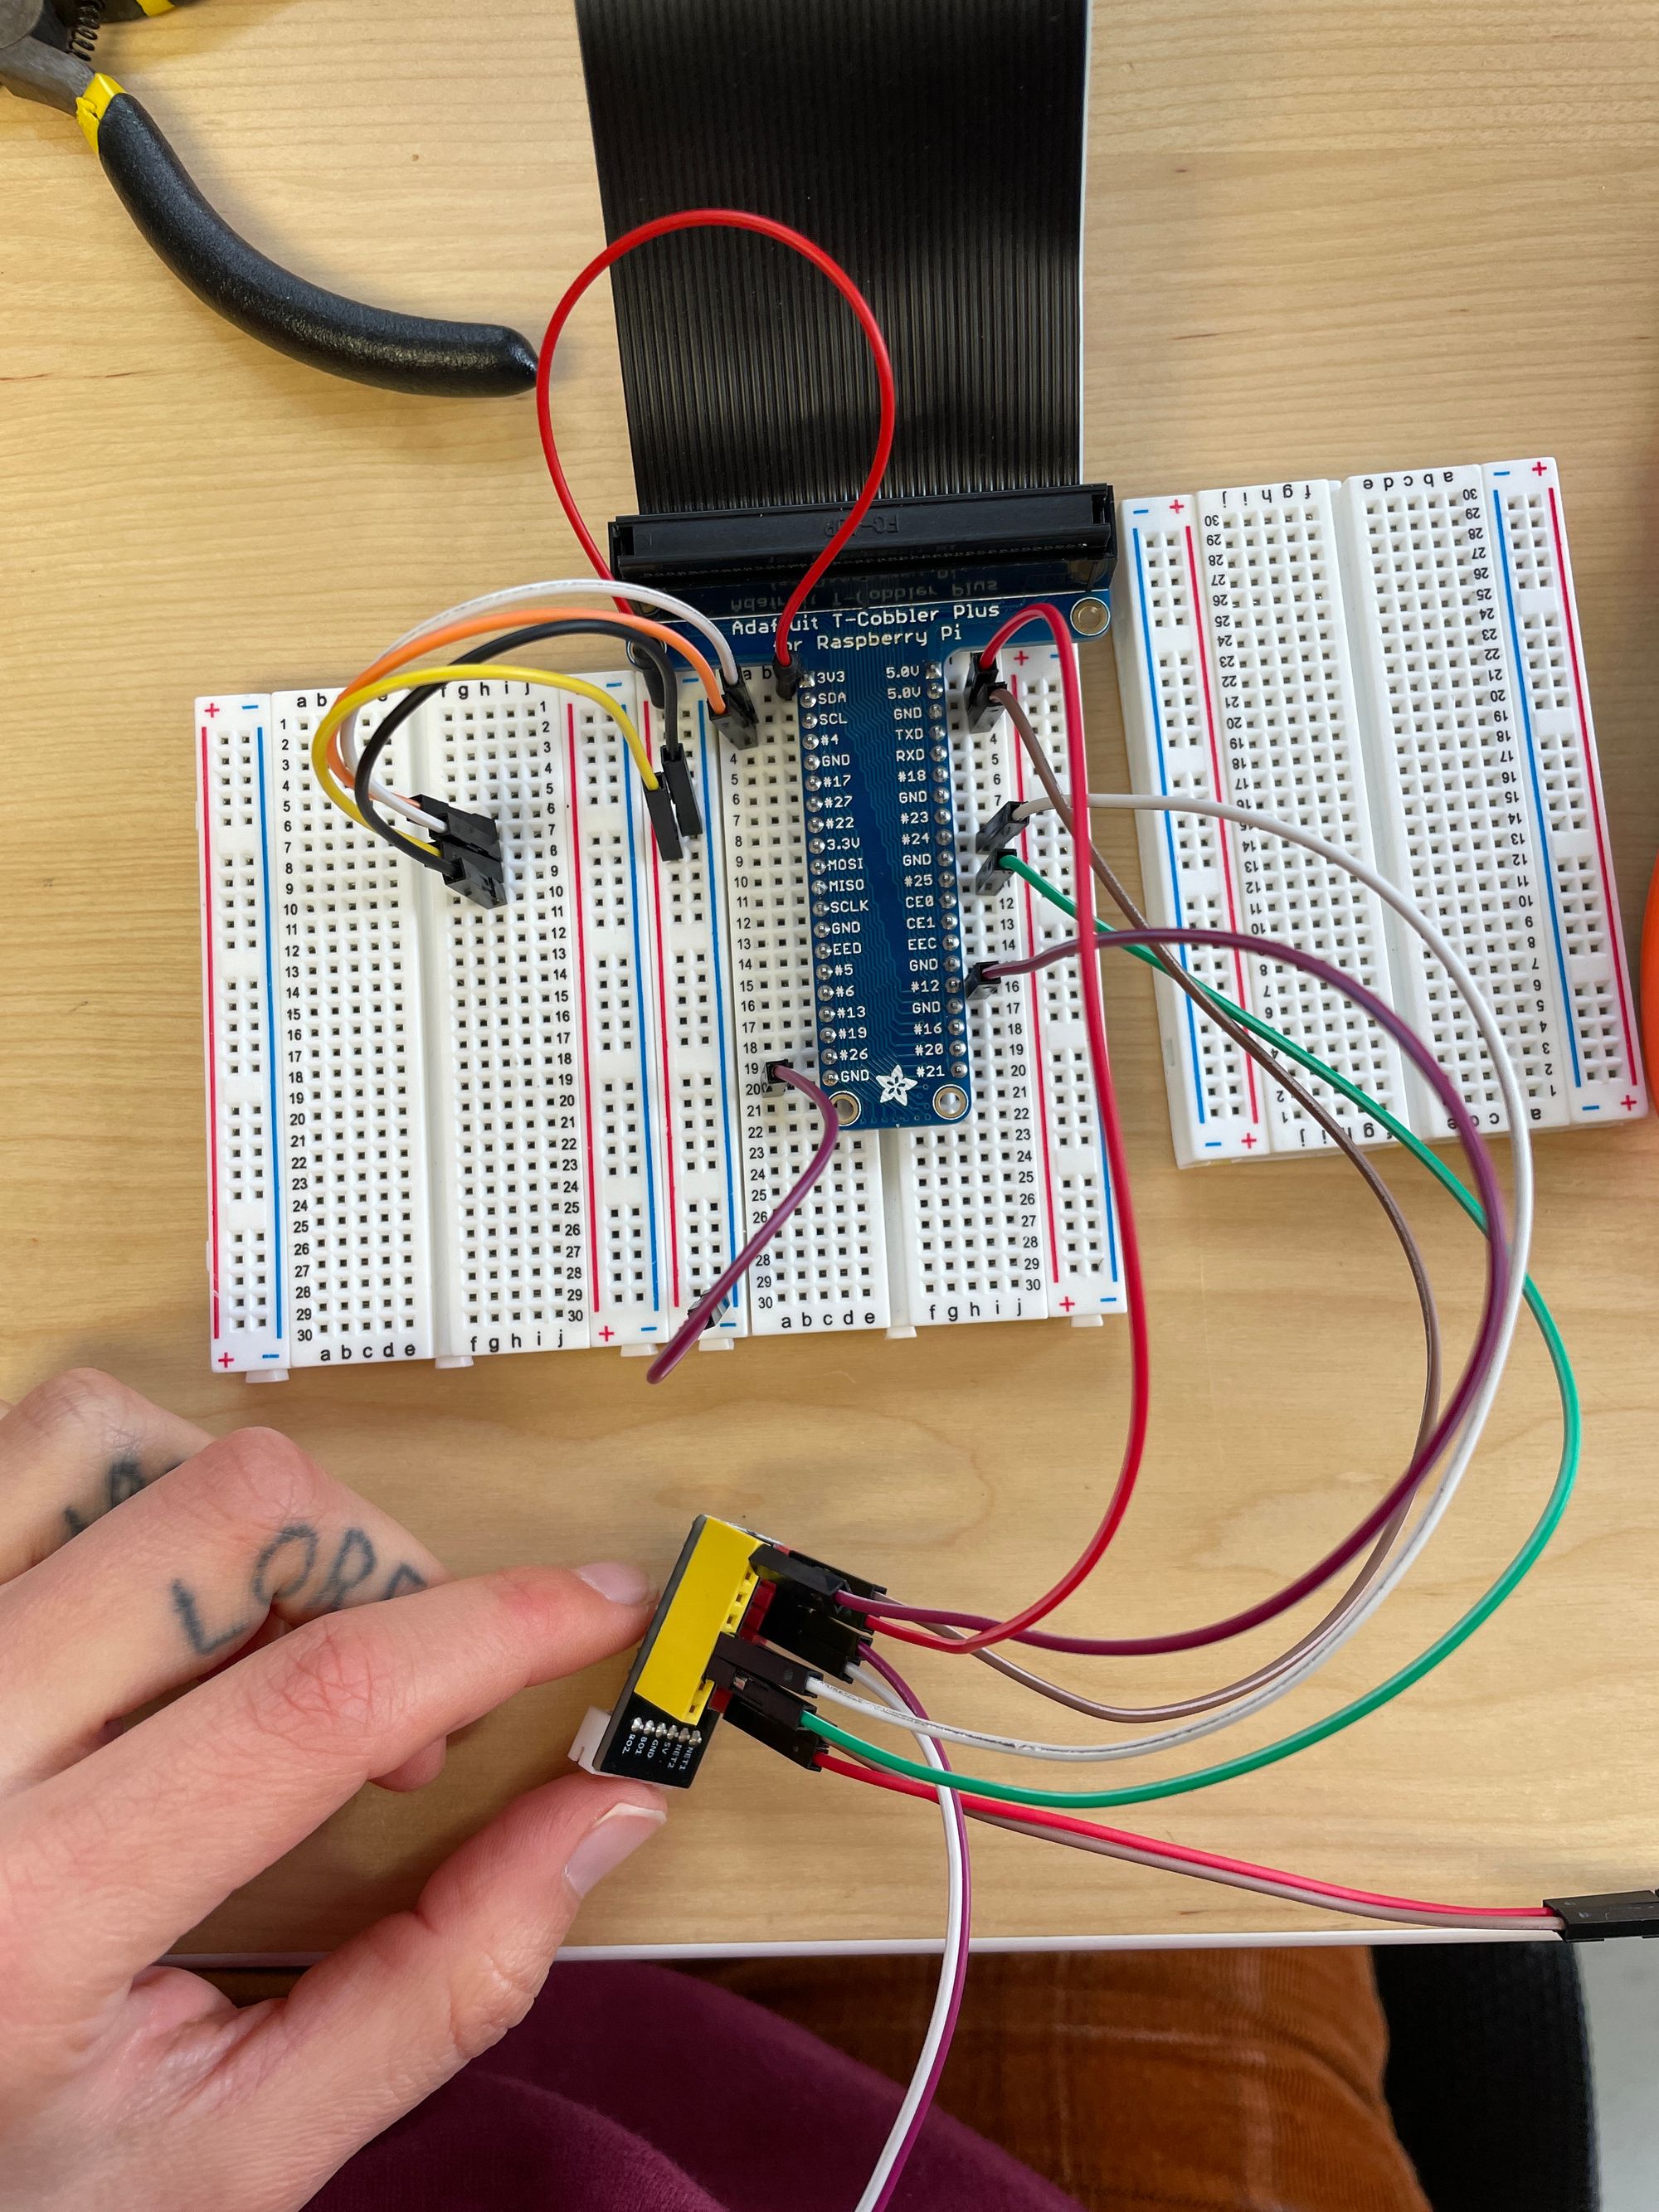
In order for the robot to seek out light, we outfitted it with a propeller-like light sensor - which is servo controlled and has a TEMT6000 Ambient Light Sensor mounted at one end. The TEMT6000 measures illuminance, with higher current values corresponding to a higher ambient brightness. For more information on this sensor and the breakout board we used in this build - check out this Sparkfun guide. In order to read the analog output from the TEMT6000, we are sending it through an analog-to-digital converter - the ADS1015.
We read values from the ADS1015 via the I2C protocol, using Pictorus I2CInput and I2COutput blocks.
For our Plantbot to seek light, we take ambient light measurements in its periphery (left, right, forward) and then drive for a few seconds in the direction that is closest to a target light value we set as a variable in our app. We retake light measurements and drive again, repeating this process until we reach the optimum light location in the room. More details about programming this process can be found in the ‘sense light’ subsection of this blog post.
Here is a first prototype of this light seeking robot, using a paper sensor “propeller” and a servo taped directly onto the robot’s frame.
Watering Bot
To be fully plant-life supportive, we are also equipping Plantbot with a soil moisture sensor, water tank, and water pump. This setup will water our plant and maintain a sufficient soil moisture level. We’re using Sparkfun’s soil moisture sensor (see this link for more information about the sensor).
Similar to the light sensor, we will be reading analog values from the soil moisture sensor and passing these through the ADS1015 in order to interpret them on the Raspberry Pi and in the rest of our app environment.
Since different soil compositions will result in different output values for this sensor, we empirically determine our moisture level setpoint here - making note of what readings we get when our soil is completely dry, watered the correct amount, and overwatered. We can then set a moisture level target as a variable in our app, and turn the water pump on for a few seconds in order to water the plant. (We’re sending an on/off signal to an N-MOSFET here, since our pump runs on 5V).
Building out the App
State Machine Design
To gracefully coordinate the watering and light seeking functionalities of our Plantbot, we can build out an app that runs moisture sensing and light sensing actions at a scheduled frequency, and sits idly (allowing the plant to bask in the sun) otherwise.
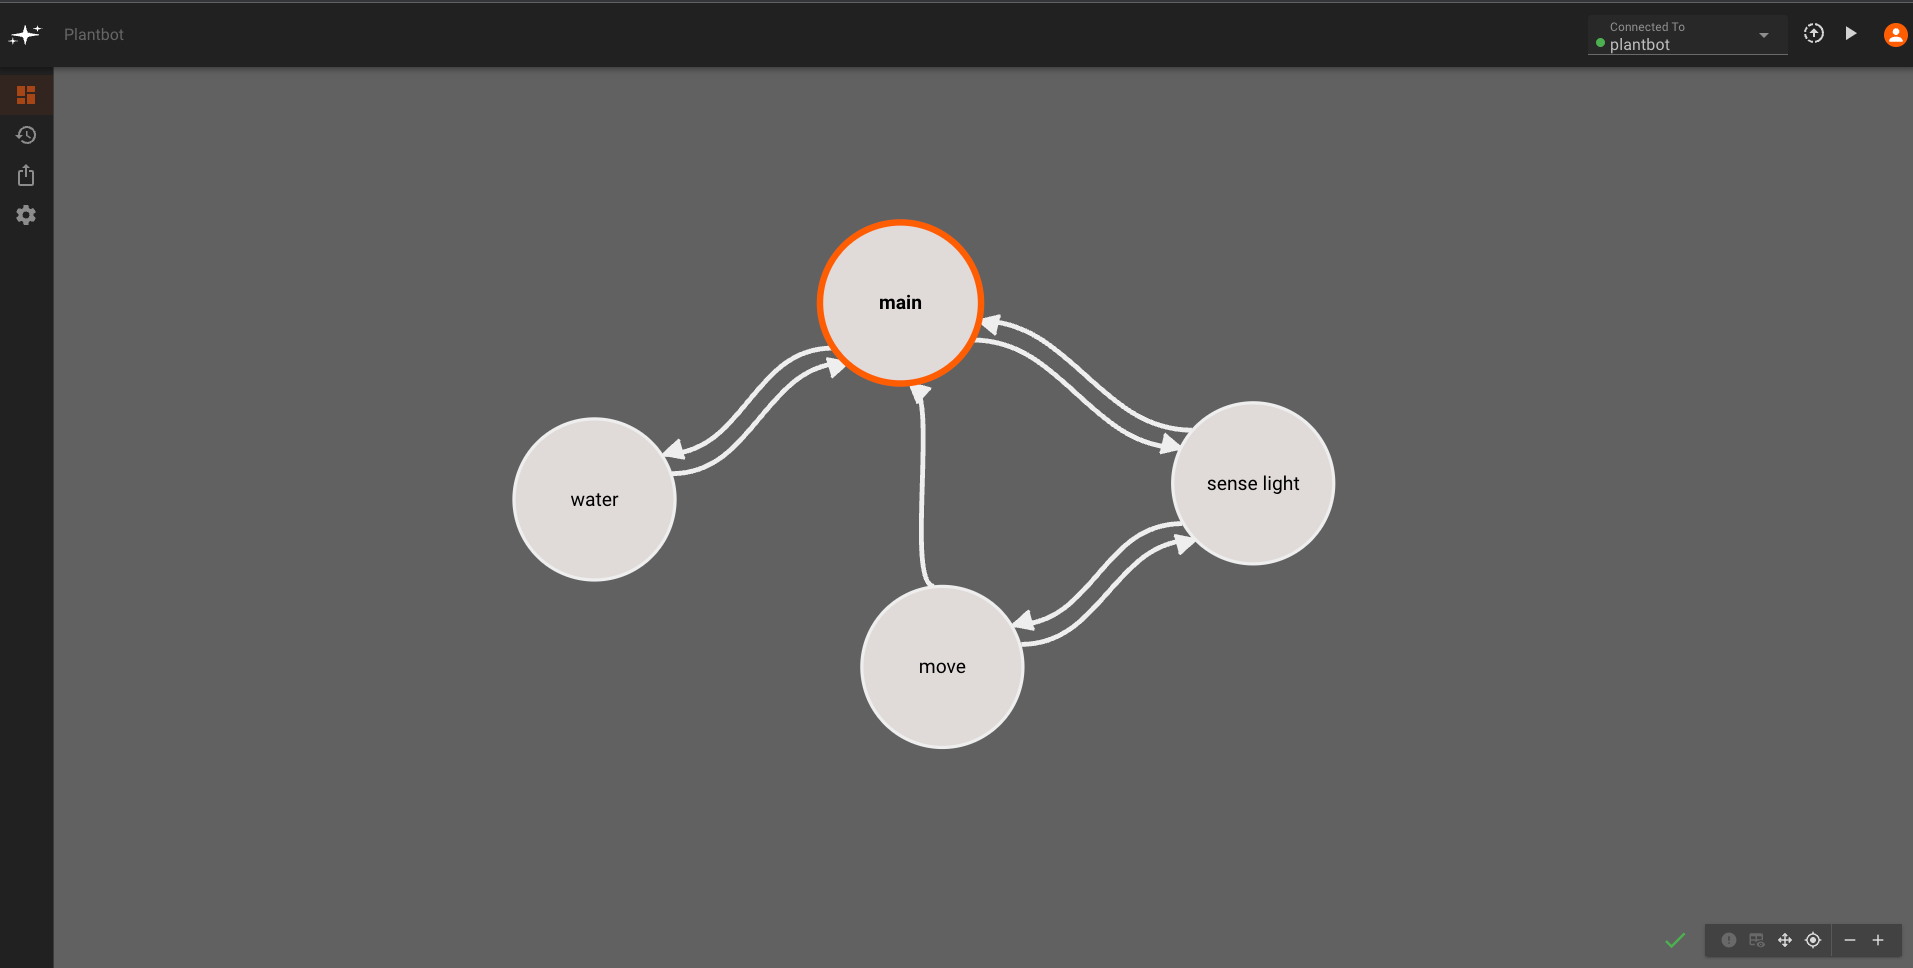
The way we’ll organize these functions in Pictorus is using a few different States - a main (or idle) state, a sense light state, a move state, and a [moisture sense +] water state.
Main State
We’ll start in the main state of our app - which will trigger either the sense light or the water state based on how long it’s been since we’ve checked the ambient light and moisture levels. To do this, we create two global variables - lightsense_frequency and watering_frequency - that set respective intervals (in seconds) at which we want to check the light and moisture levels for our plant. We’ll set the light sensing sequence to run every 311 seconds (~5min, but offset from the watering frequency) and watering sequence to run every 600 seconds (10min).
Each time we run either the water state or sense light state, we’ll store the current time into a last_time_watered or last_lightsense_time, using a SystemTime block. This way, whenever we’re back in the main state, we can compare the current SystemTime with the stored last watering or light sensing time, triggering either state again once the time elapsed reaches the lightsense_frequency or watering_frequency value.
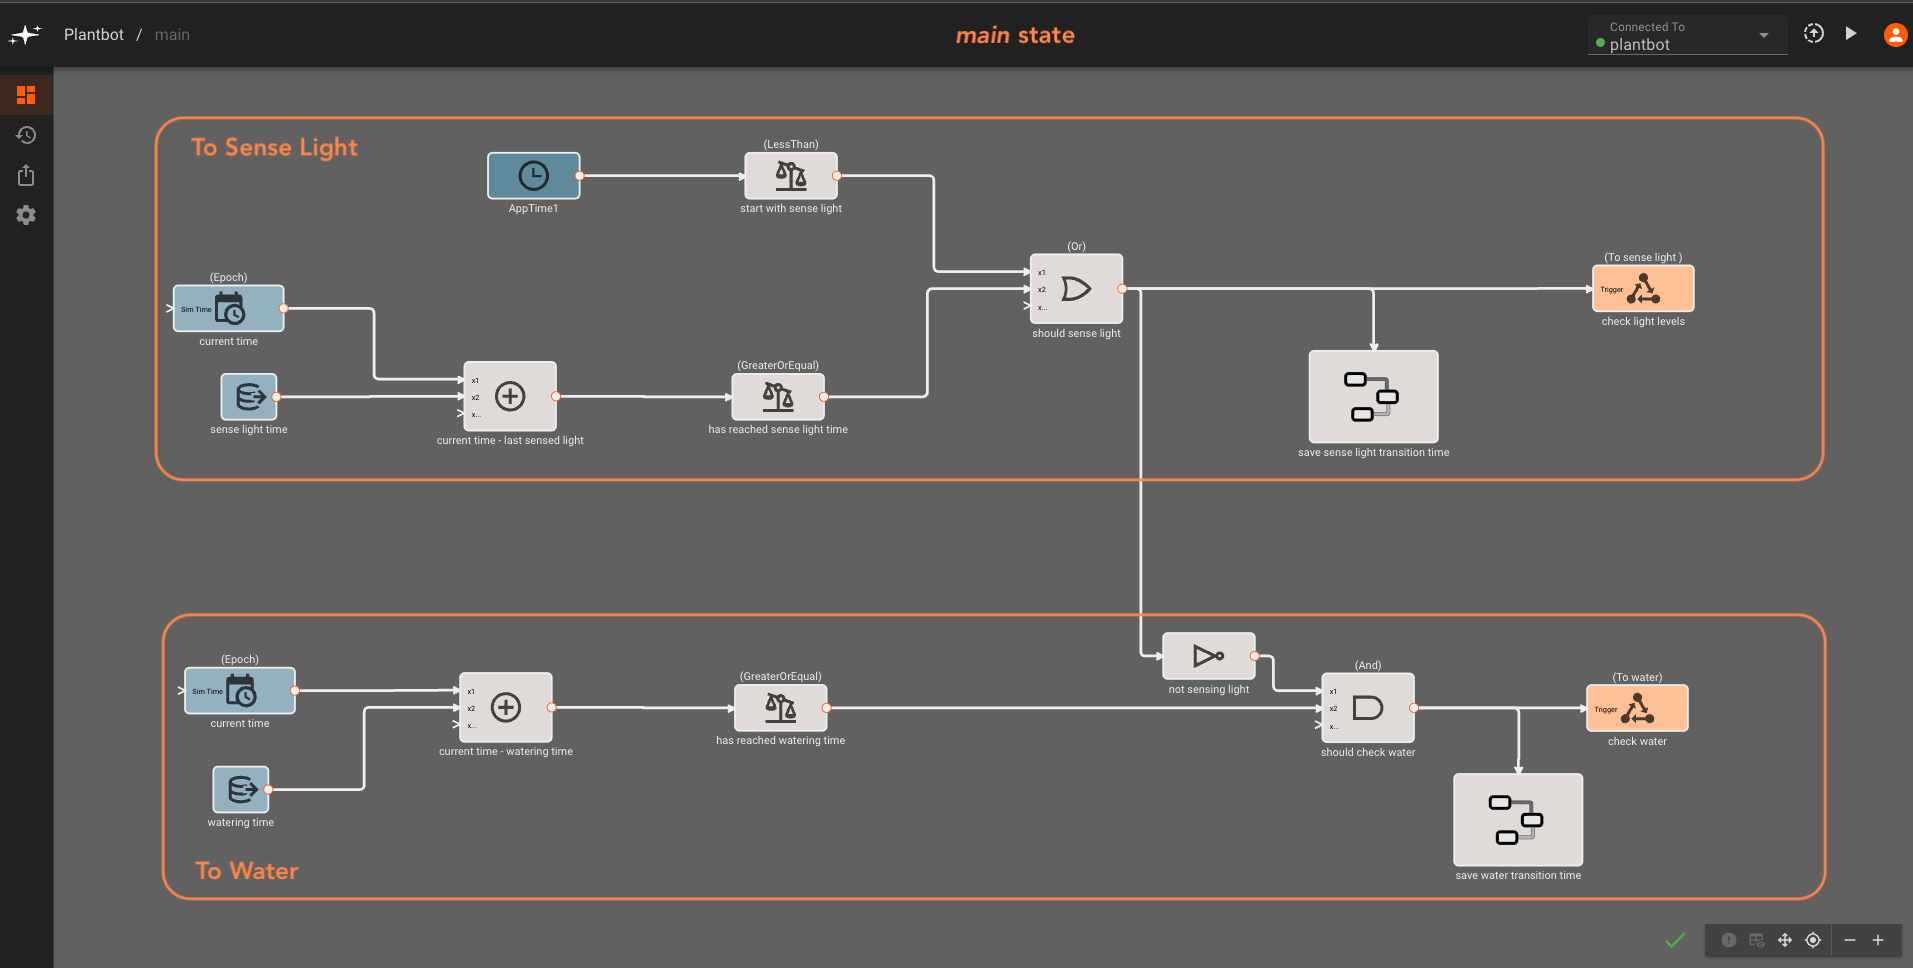
Finally, since both the last_time_watered and last_lightsense_time are initially zero when our app starts, we set one state to always run automatically on startup. We do this with an AppTime block that triggers the sense light state within the first hundred milliseconds of the app starting up. To ensure that only one state is triggered at a time (in addition to being timed at different frequencies) the water state transition only occurs when the sense light transition condition is not true.
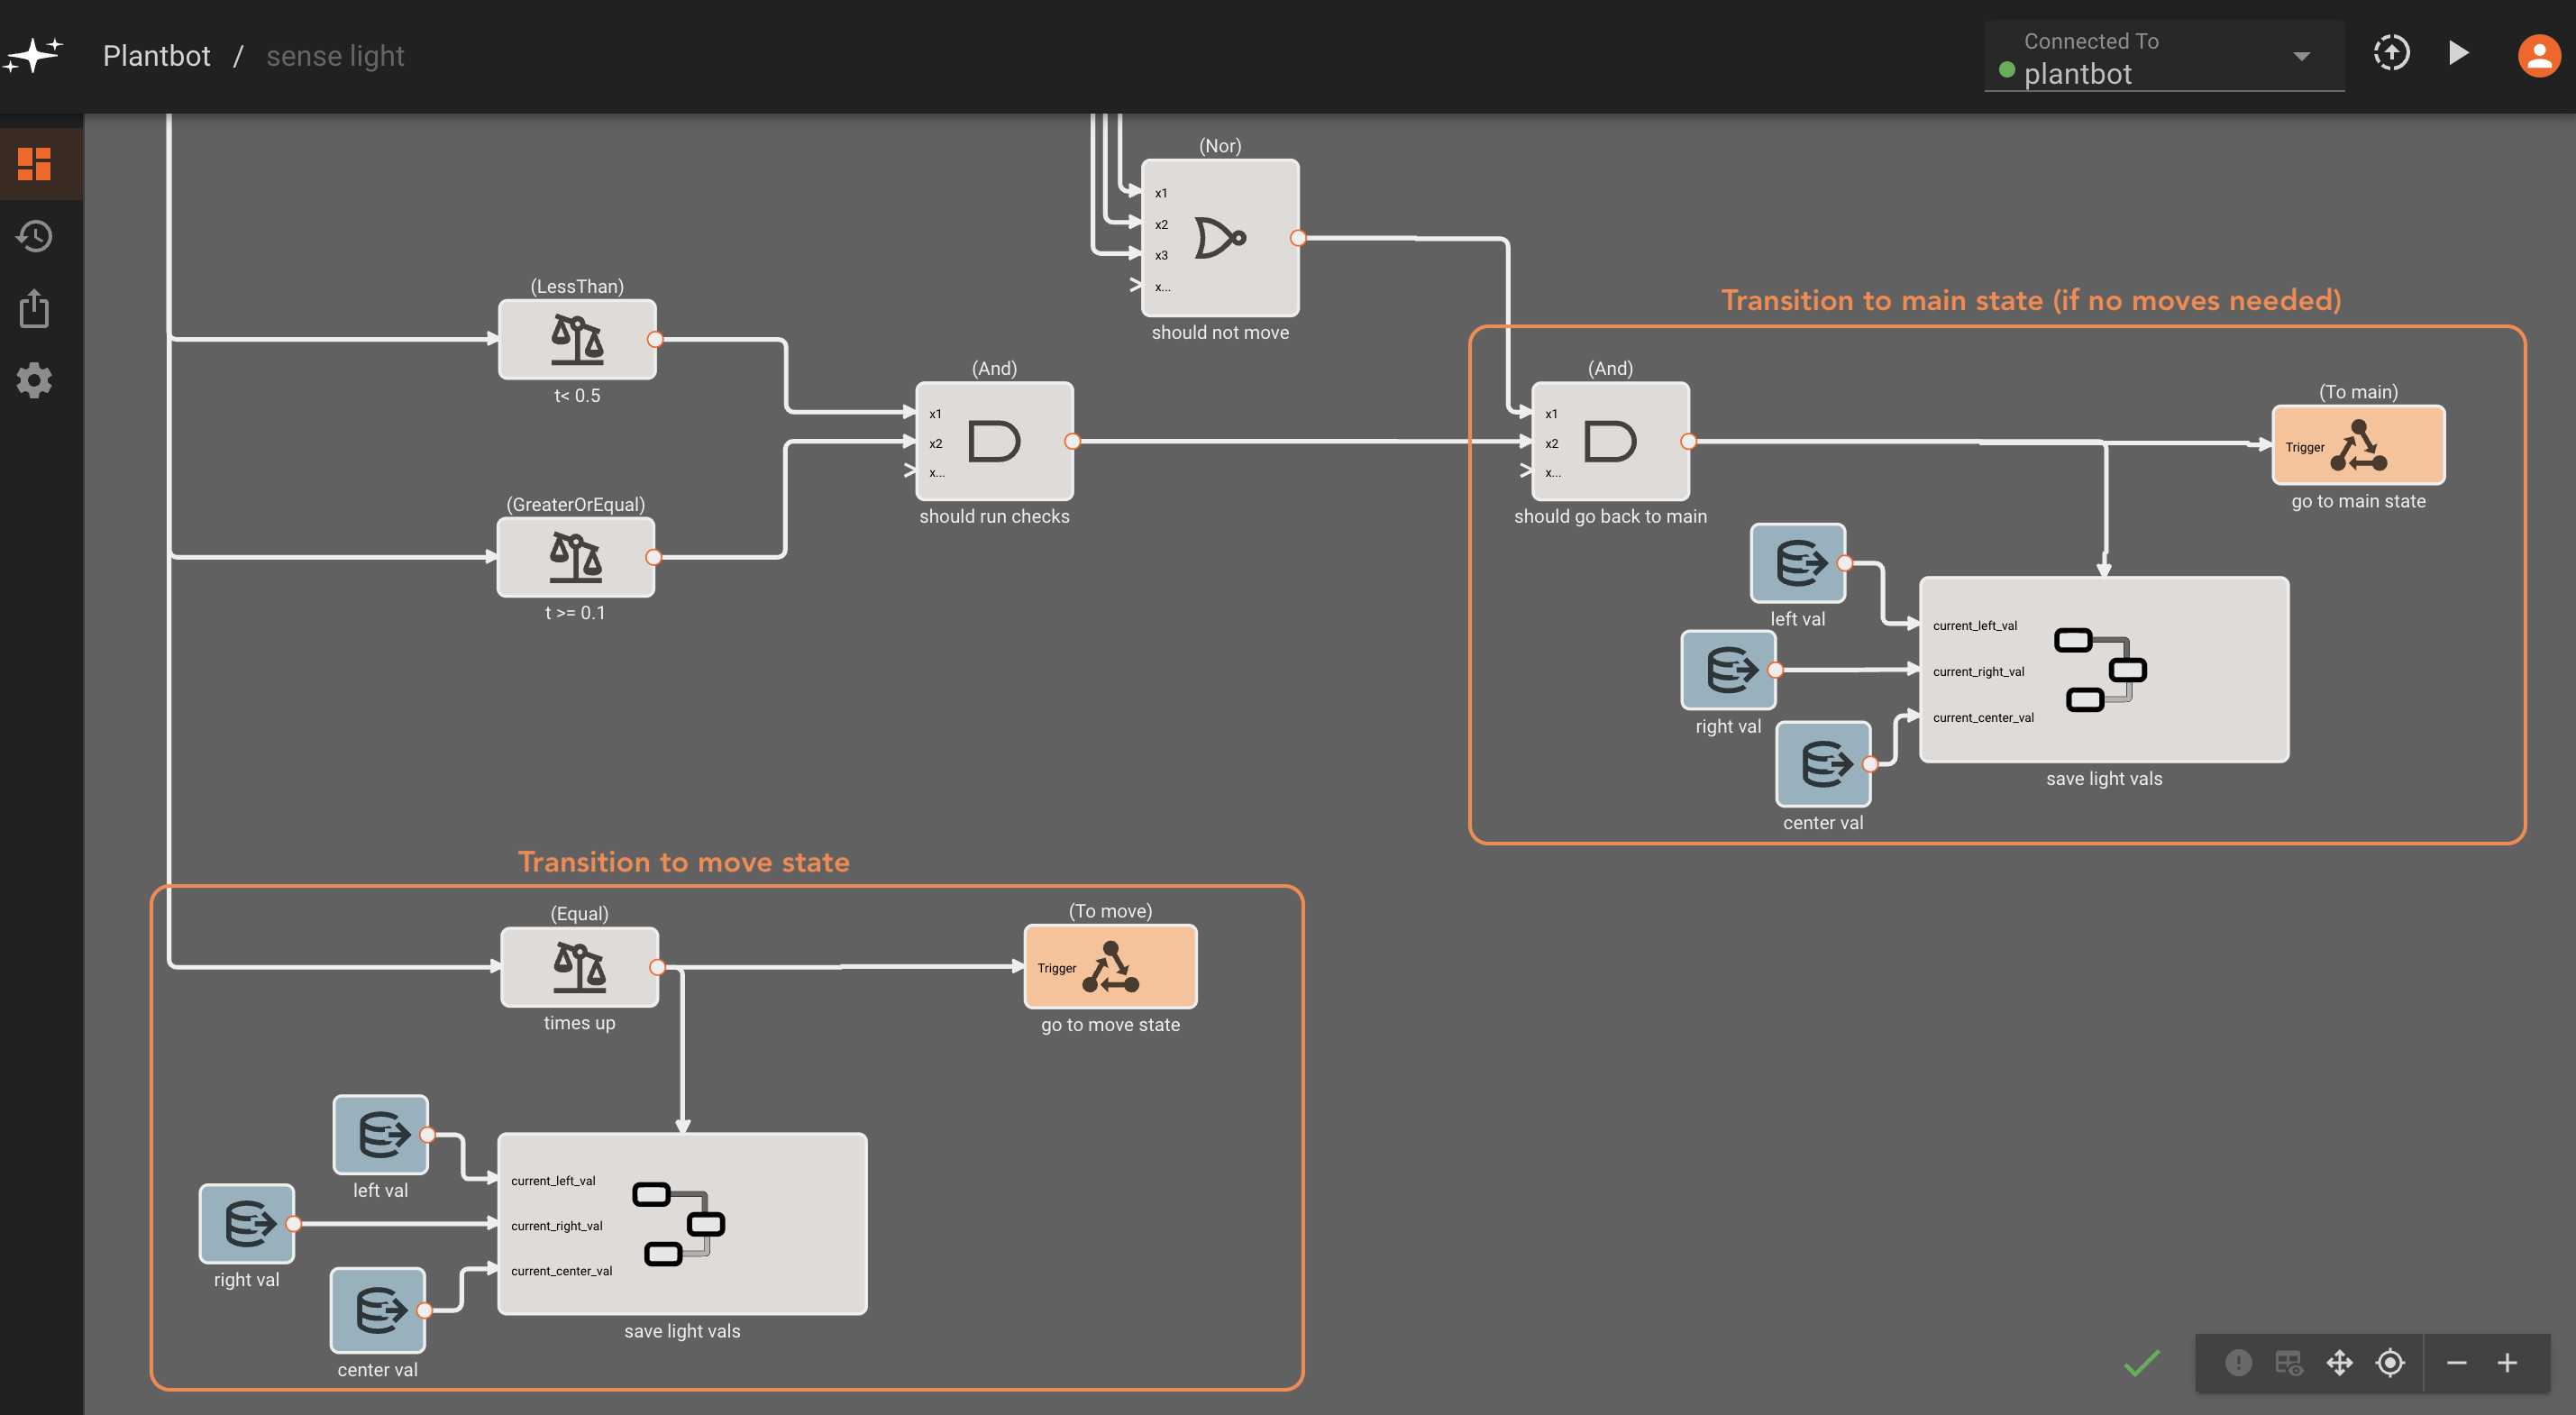
Sense Light State
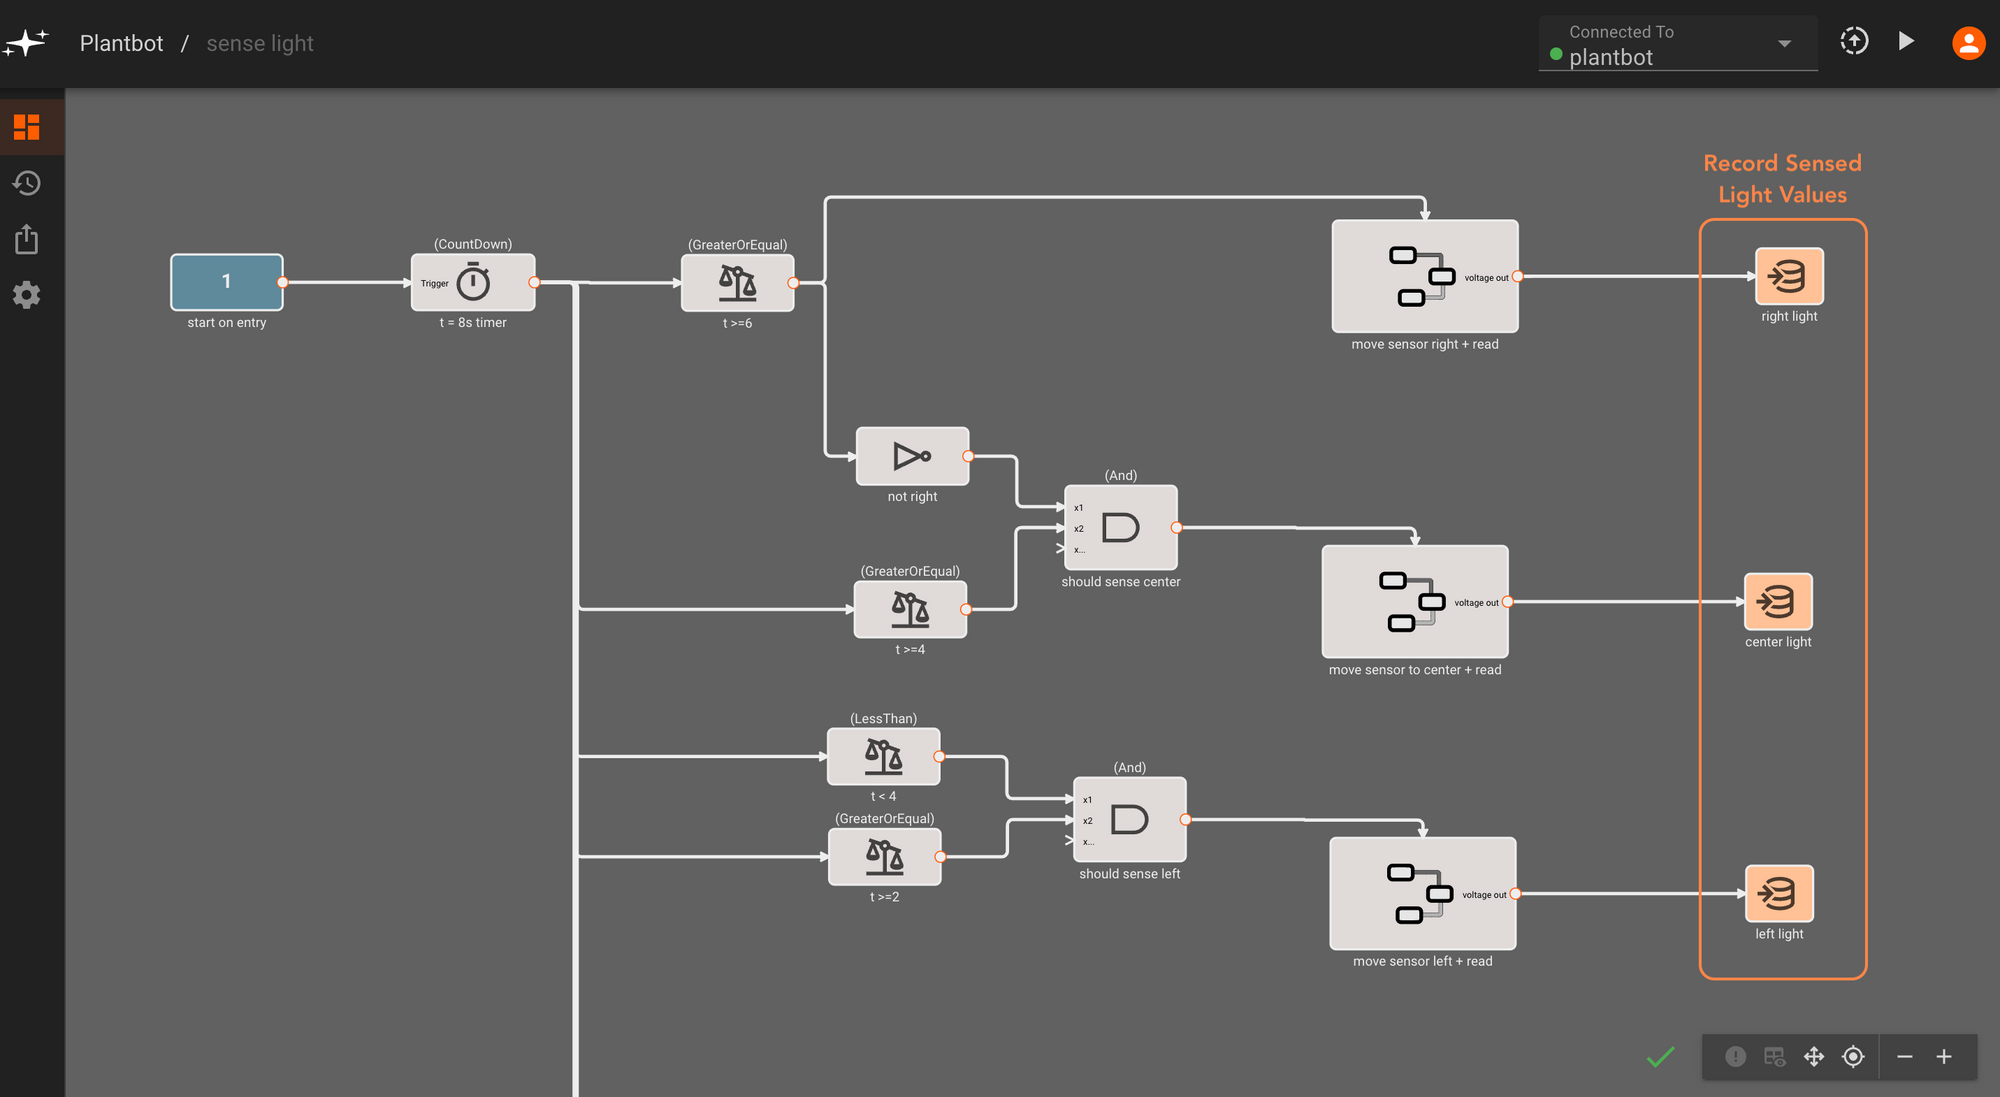
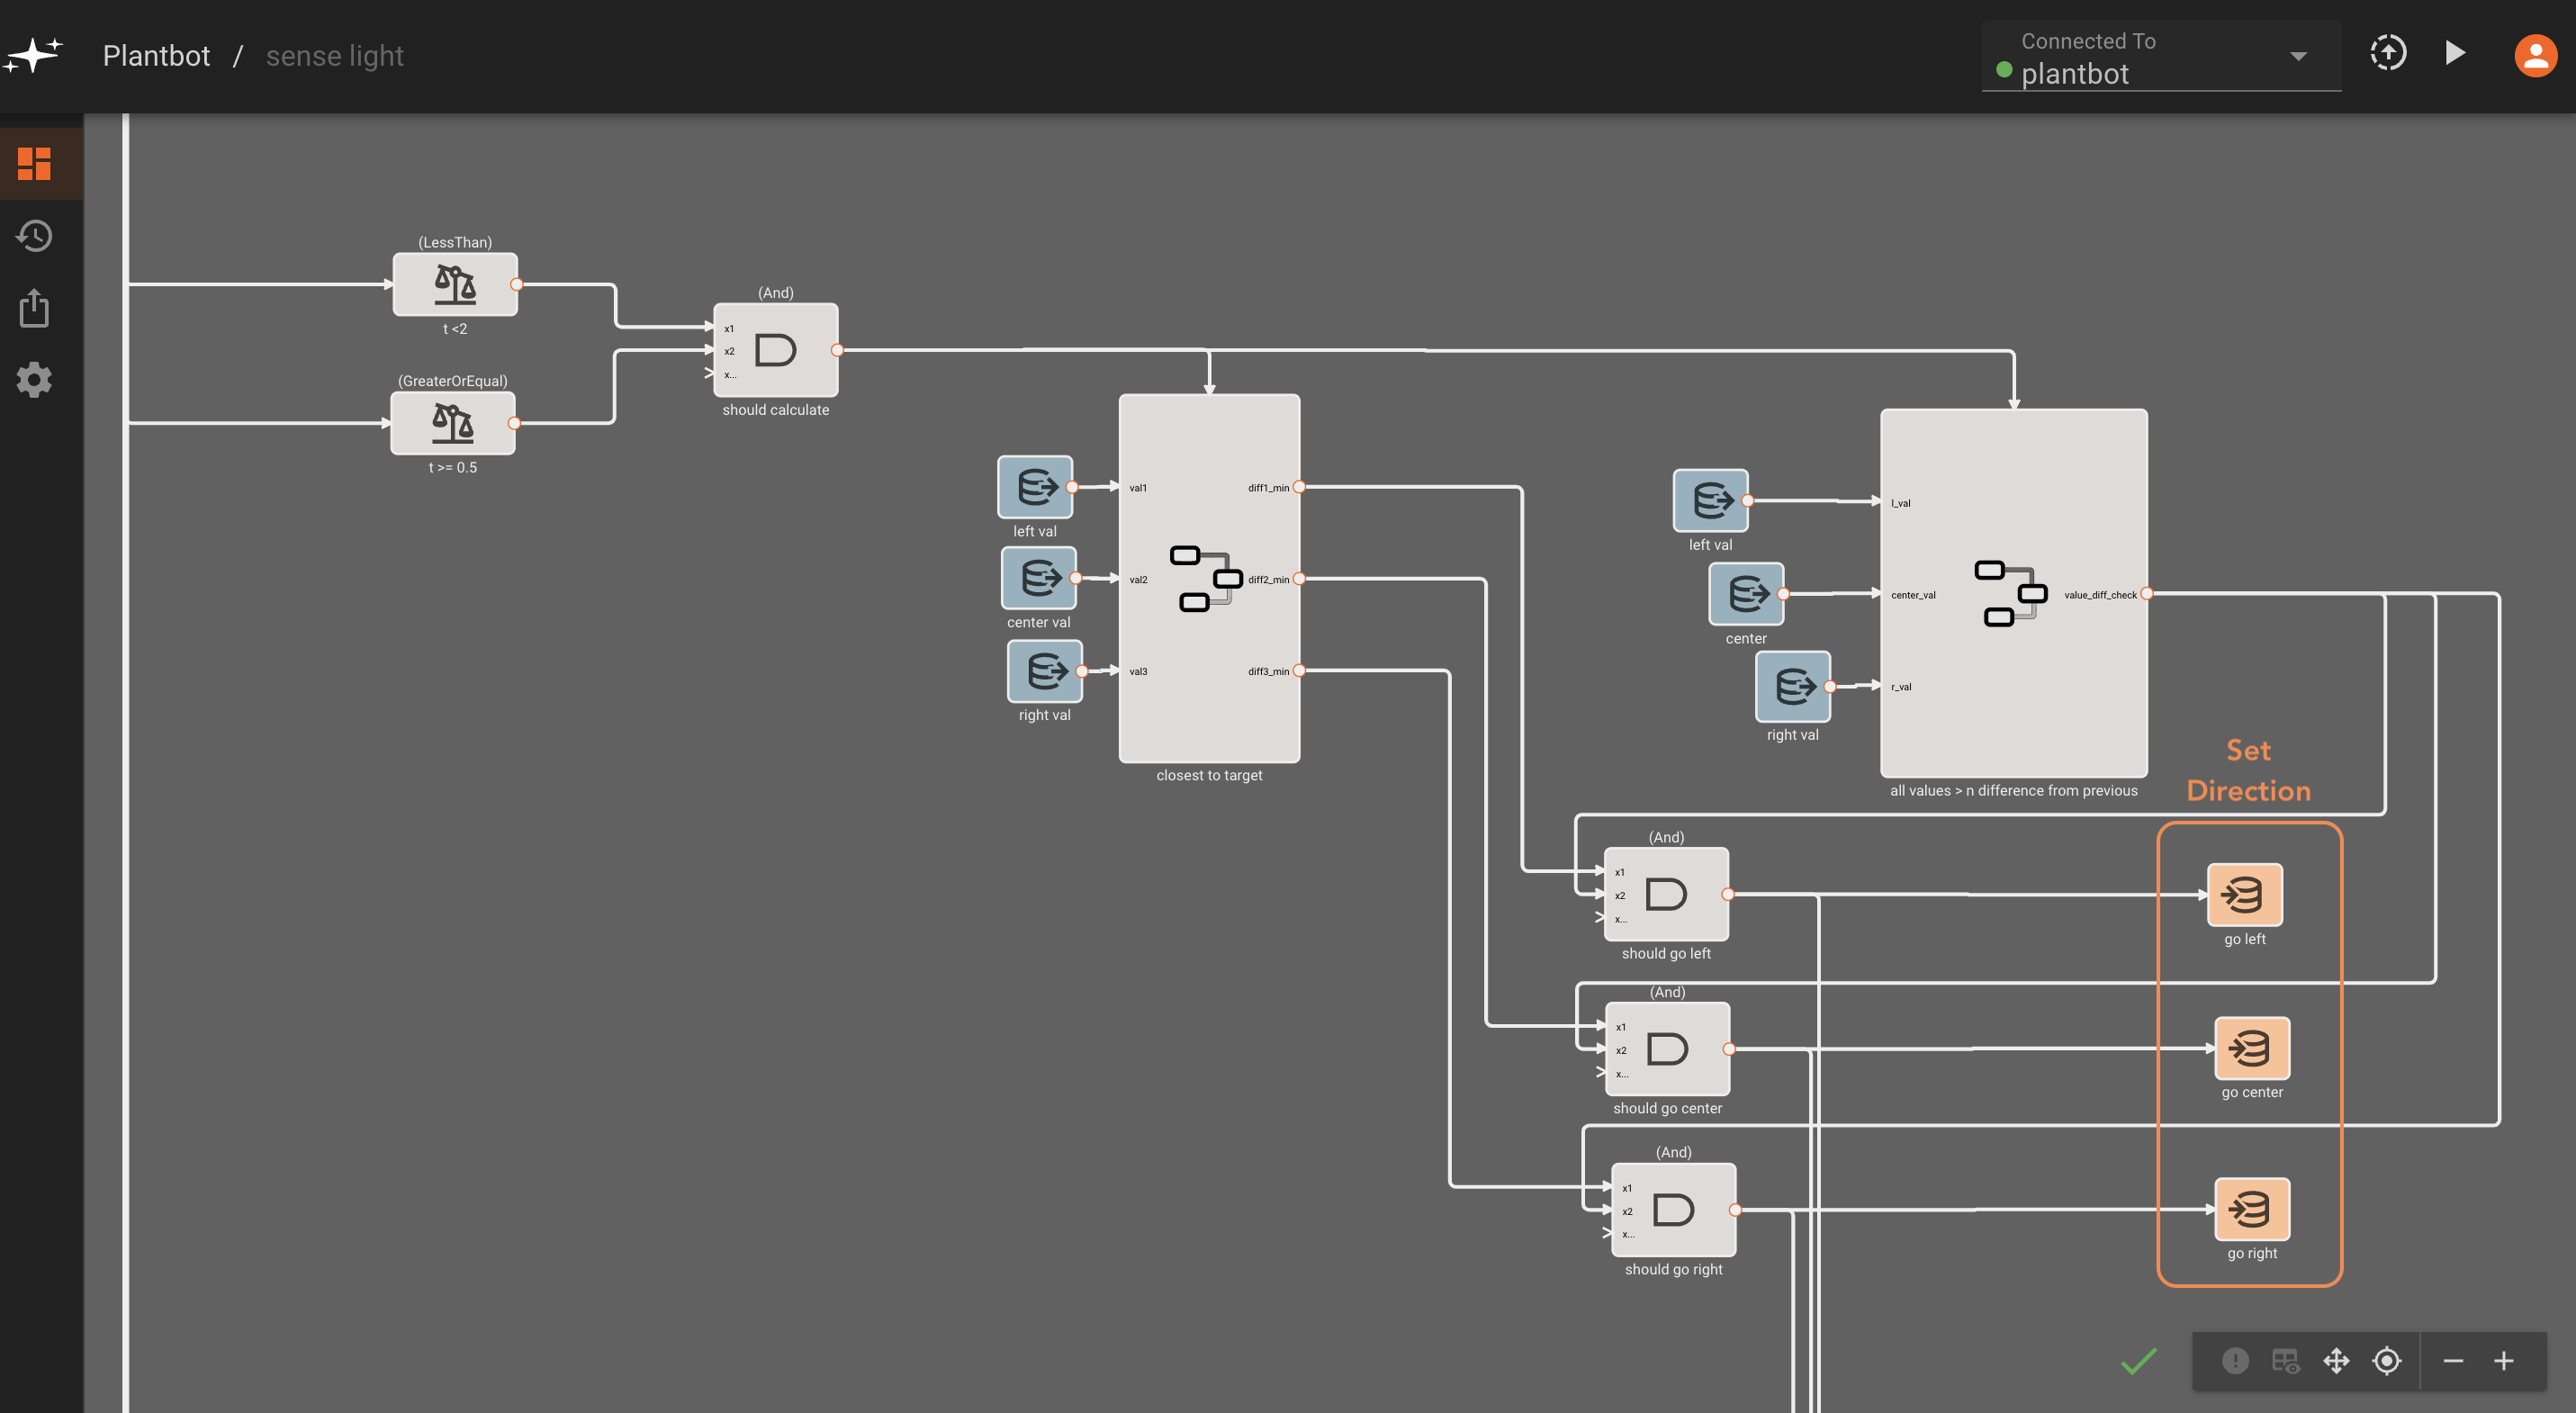
In the sense light state, we trigger a sequence of steps based on a countdown Timer block that starts when we enter the state. We spend the first 6 seconds sensing light to the left, right, and in front of the rover by moving a servo in the three directions. Then we determine the preferred direction to steer in (or if we should not move) based on a target light value. At this point we can write True or False values to three direction-steering variables - go left, go right or go center (forward). Finally, when our Timer has reached zero, we either move back to the main state - if we sense an adequate amount of light - or go to the move state. The sense light state will eventually be triggered again depending on the lightsense_frequency value.
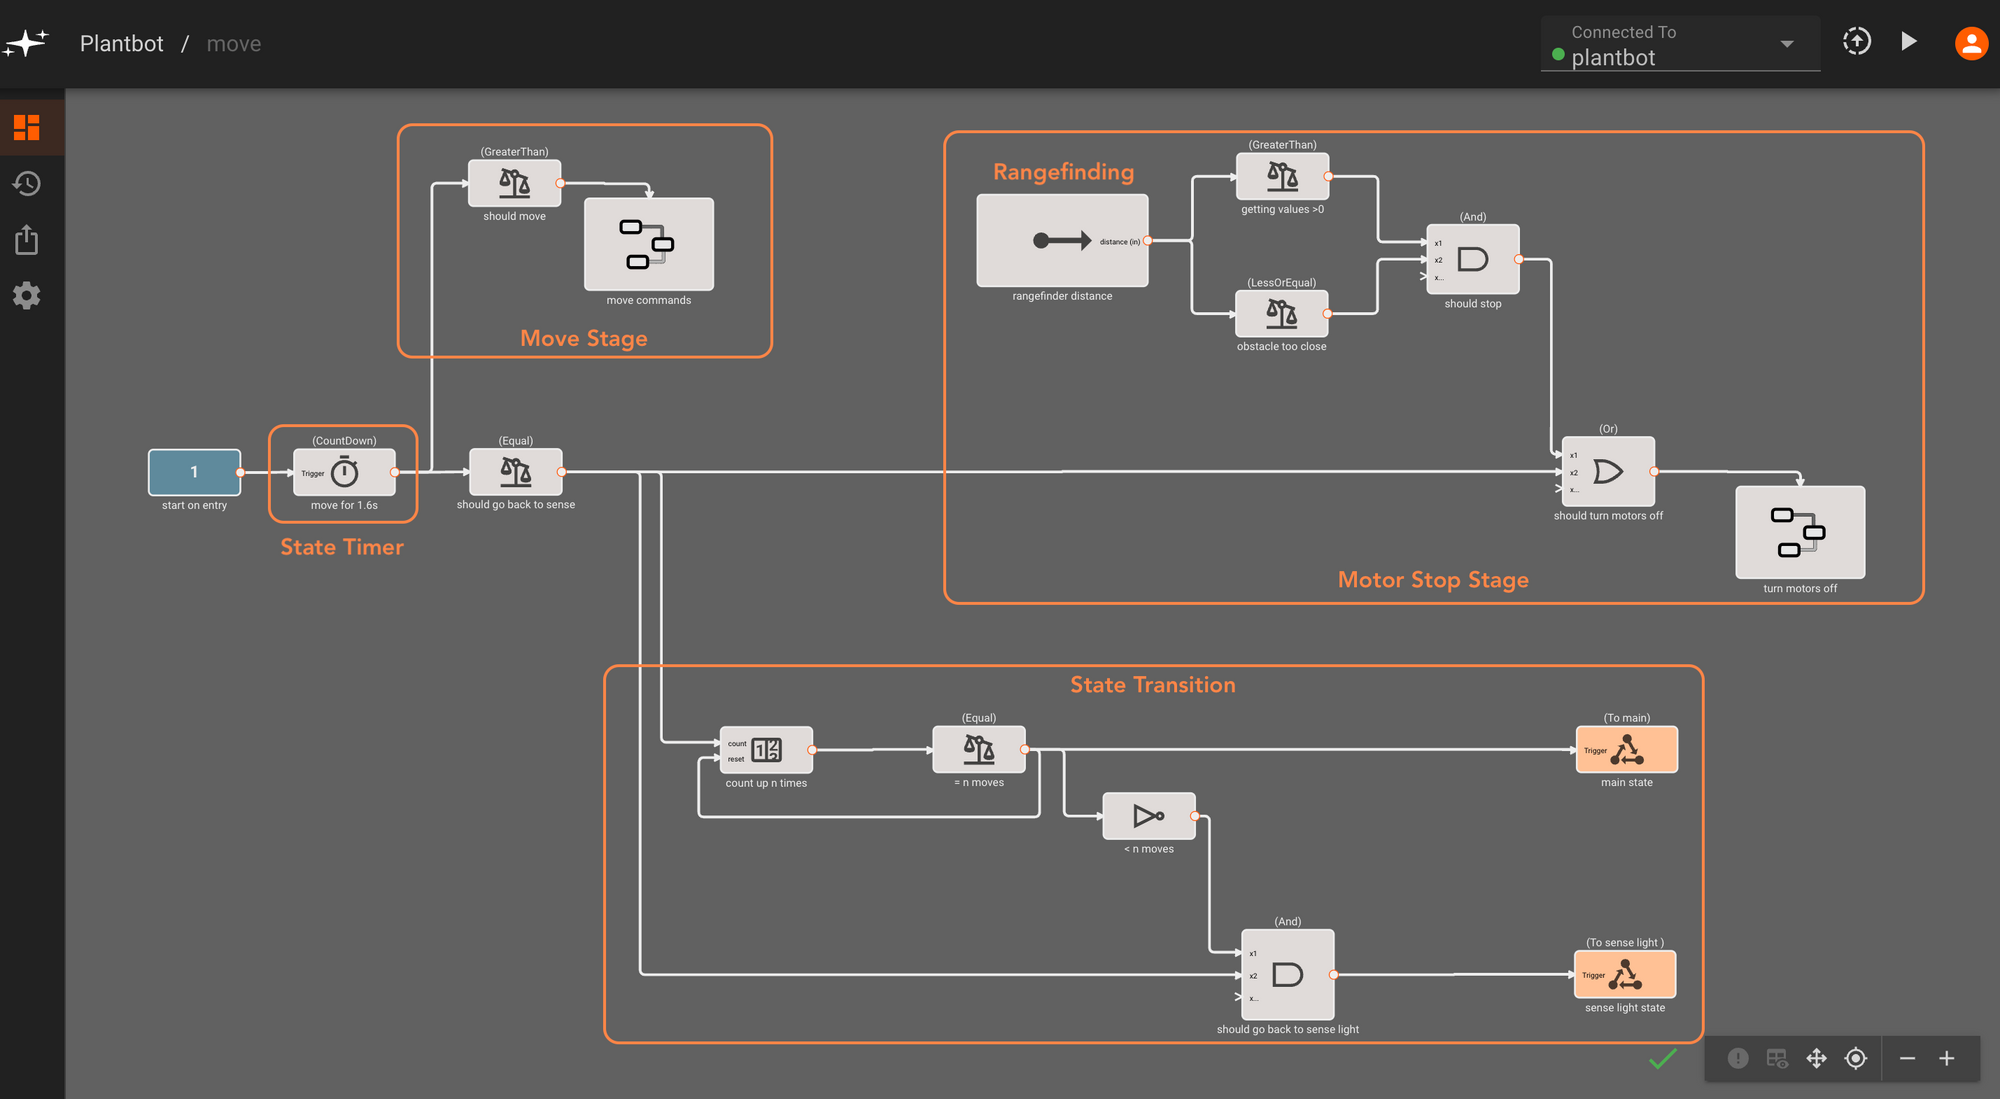
Move State
Similarly to the sense light state, we set a countdown Timer block for this step - allowing Plantbot to move for just under two seconds, and then transitioning either back to the sense light state or the main state if we’ve reached the maximum allowable amount of moves. The rover steers in the direction commanded by the steering direction variables, set in the sense light state. During the move state, we also have a range finder component that triggers a stop if we are too close to an obstacle.
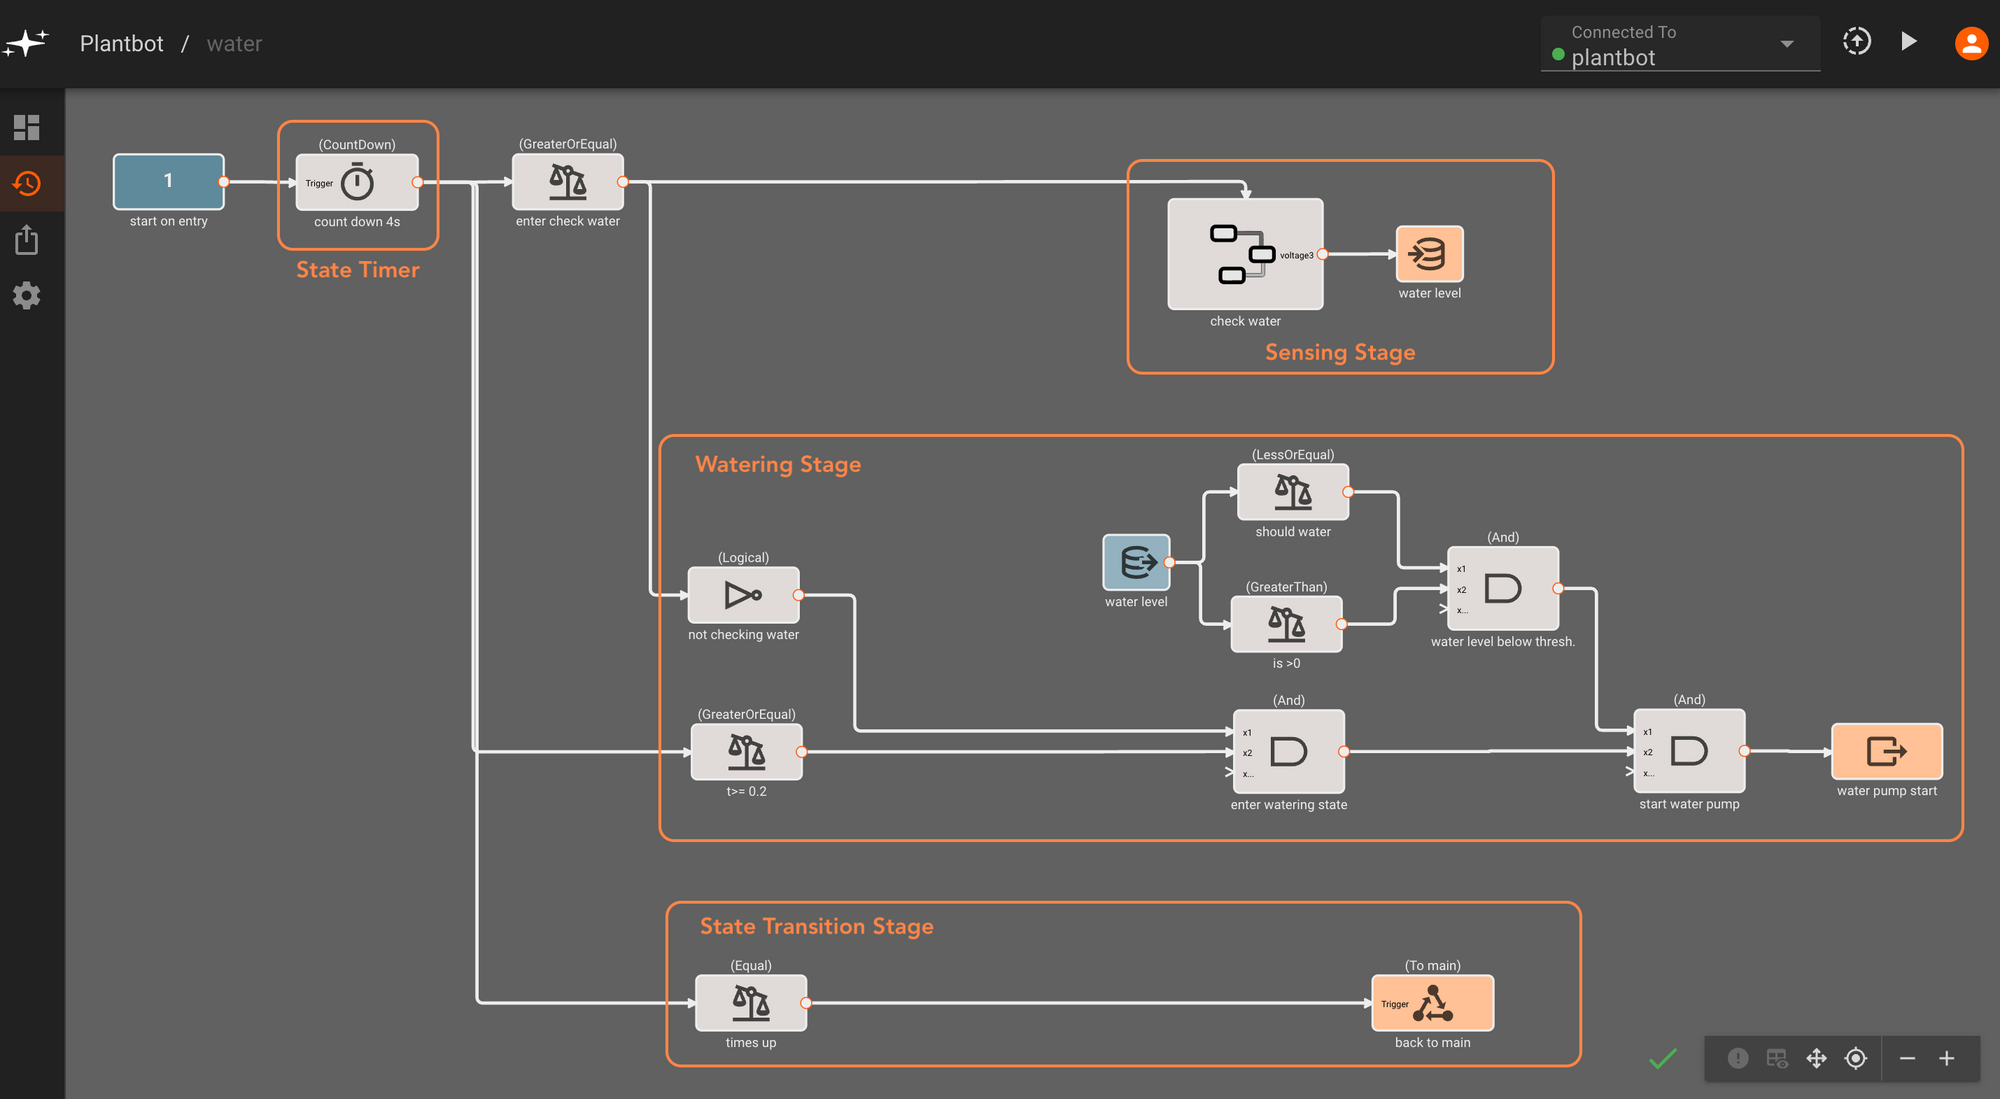
Water State
The water state is triggered from the main state at the rate set in the watersense_frequency variable. You might be able to guess at this point - we use a countdown Timer block to perform a series of three steps: sensing, watering (if necessary), and then transitioning back to the main state once the Timer block has counted down to zero. In the first step of this process we read from the moisture sensor and write it to a global variable (water_level). Then, we compare this value to the water_threshold target value, which triggers the water pump if we are below the target.
That’s all of the core app functionality! Now we can move on to putting all together in hardware.
Building out the Hardware
The hardware build for this project is fairly simple given that we’ve repurposed an existing vehicle frame. We can design and print a tray that mounts onto the top plate of the rover’s frame, accommodating a light sensor/servo mount, a small potted plant, and a water tank (a repurposed leak-proof container with some holes drilled into the lid).
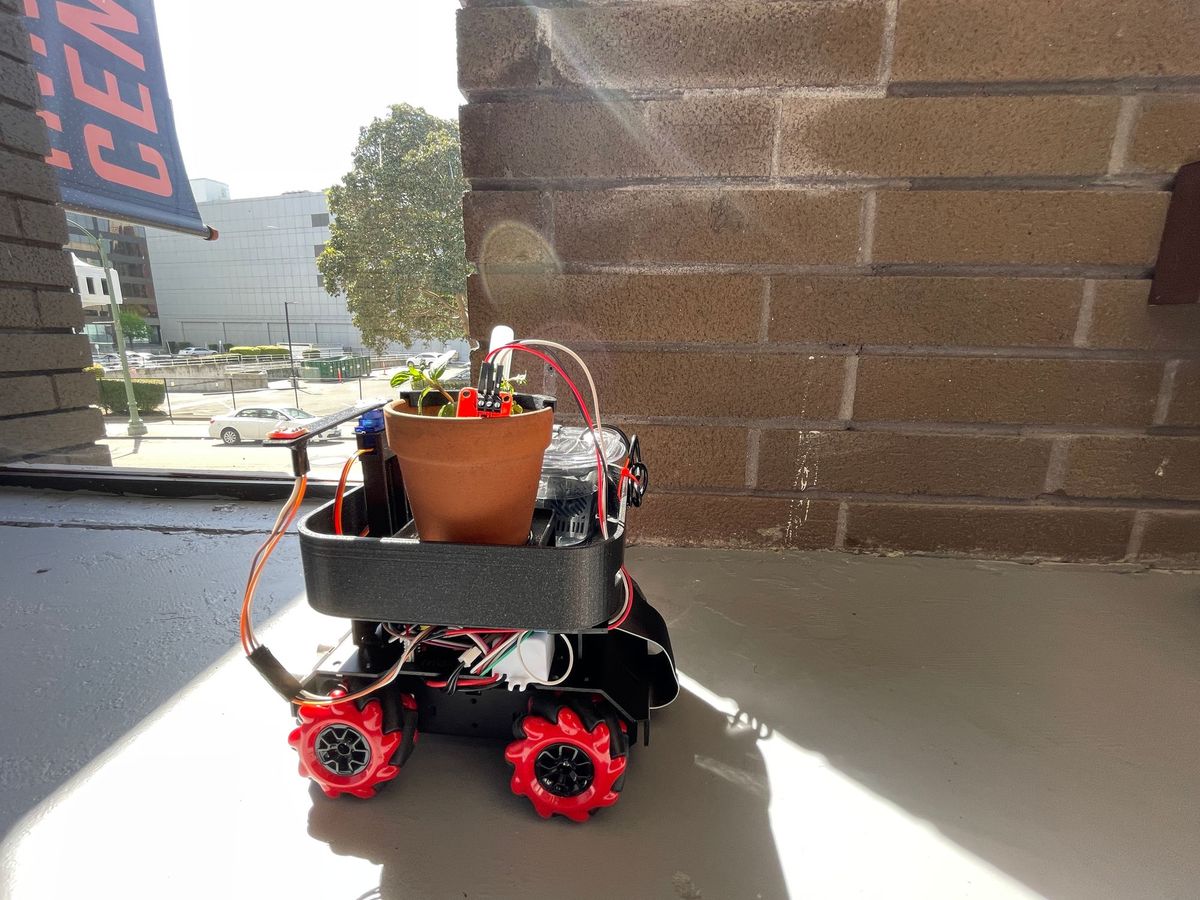
After printing all of the components, we can secure the holder tray onto the vehicle frame - with a peppermint plant and the water tank snugly fitting into the enclosure.
Once all of the components are wired and we’ve equipped the Pi Zero with a battery pack, we can fill up the water tank and let Plantbot do its thing. Here are some actions shots:
Encore - Plantbot Web Dashboard (with Pictorus UDP)
Given that our Plantbot is designed to run with minimal intervention and for long lengths of time, it would be useful to be able to track its current state as well as its history of sensed water/light readings as a form of feedback.
Since the plotting tools within the Pictorus developer console are meant for real-time debugging and development, we're going to experiment with another solution for setting up a longer running dashboard onboard the Pi.
Sending and storing data from the onboard Pi to a separate server is straightforward with Pictorus’s UdpTransmit block. For Plantbot, we packaged up some of the data we were already storing as global variables - light values, water level, and last water/light sensing times - into a JSON formatted string. We connect a few data reads for variables of interest to a JsonDump block, and then pass this to the UdpTransmit block which contains the address of one of our machines.
On the server side, our machine can store the json values in a CSV file that serves as a local database. We can skip the saving of duplicate values in case our app is sending data in between sense states, when values are unchanging.
Finally, we can spin up a web app that plots our locally saved values - plotting light and water level values over time, as well as the last time we performed light or water sensing functions (as a quick indicator of when the next state change may occur).