Controlling a Pictorus app over UDP from Python
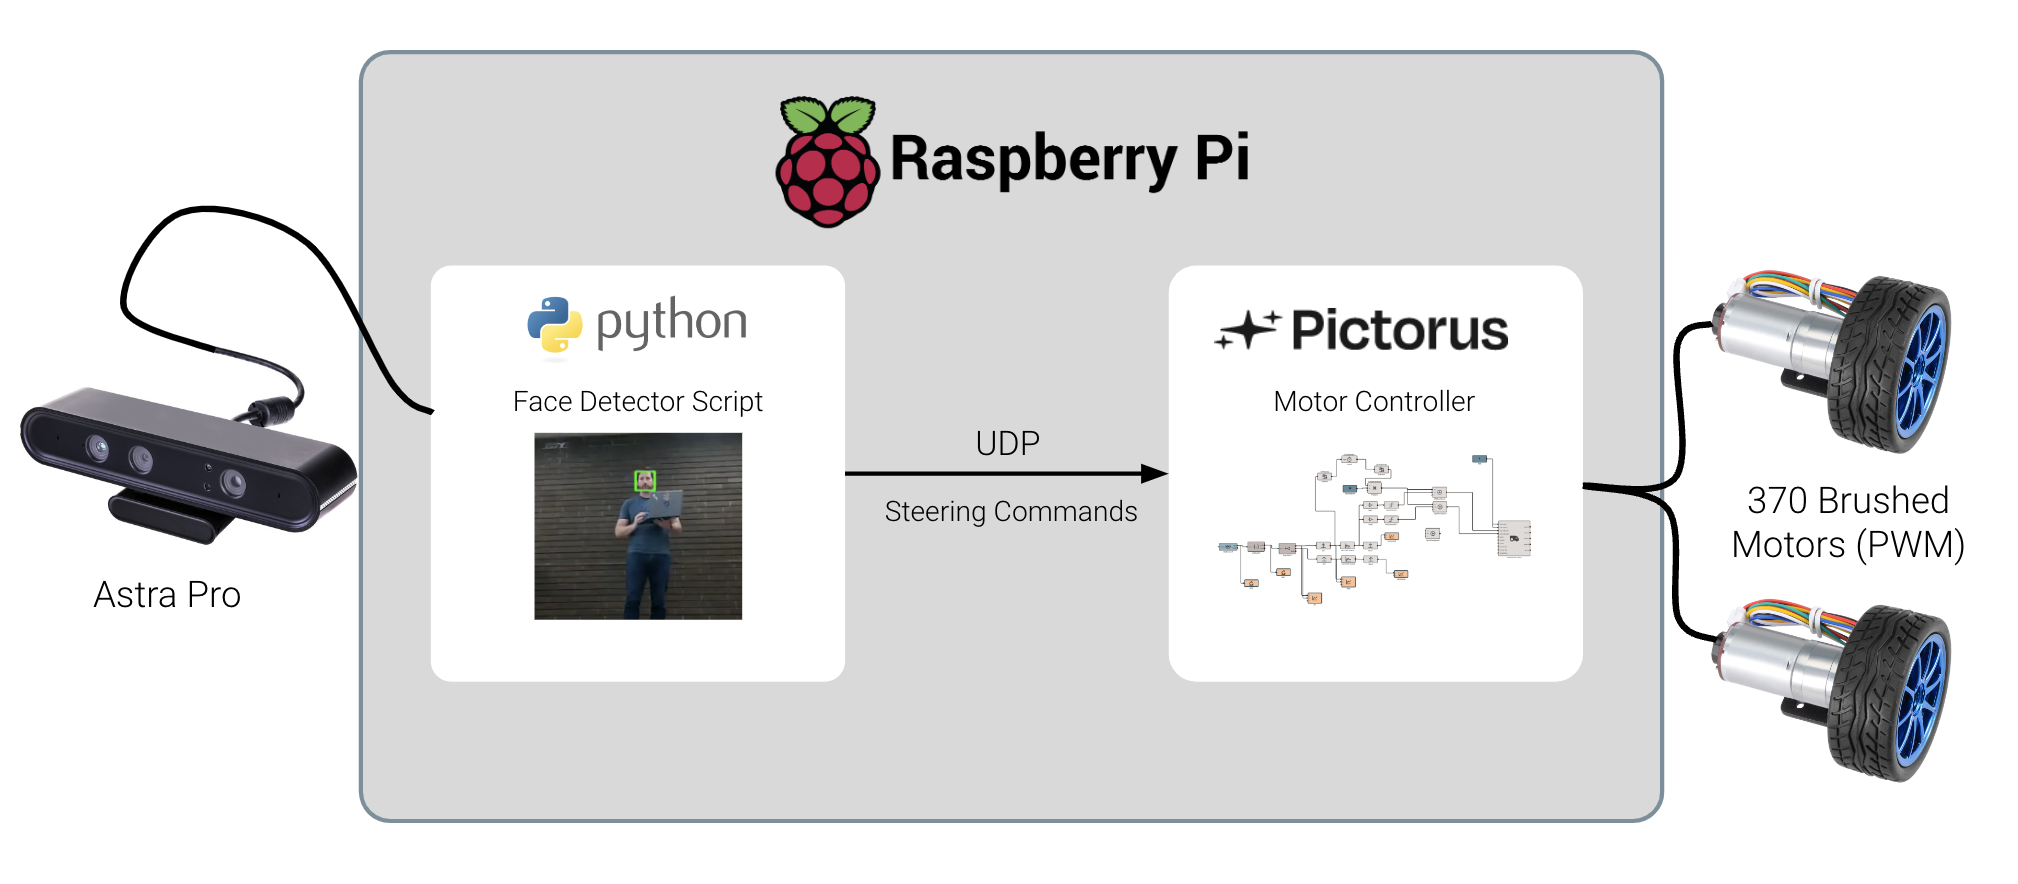
In this blog post, we will demonstrate communication between a Pictorus motor control app, and a high-level Python controller, employing an OpenCV facial tracking algorithm leveraging an onboard camera.
Robotic projects often consist of multiple applications communicating with each other locally or across networked microcontrollers. In complex settings, using a middleware suite like ROS to orchestrate inter-process communication is typical, but in simple scenarios with just a few apps the overhead involved with ROS can be overkill. Easier inter-process approaches, such as UDP or Linux pipelines do just fine and require a lot less effort.
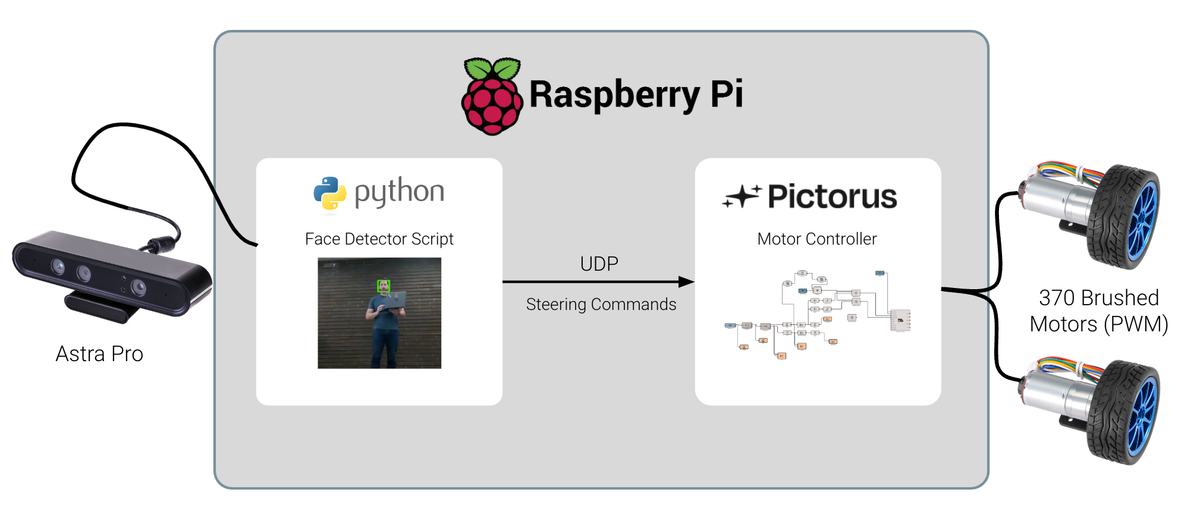
In this blog post, we'll demonstrate communication between a compiled Pictorus motor control app and a high-level Python guidance script utilizing OpenCV facial tracking over UDP to steer the robot toward faces seen by a camera.
For this demo, each app will be run as a separate process on a Raspberry Pi 4. Eventually, you'll be able to deploy Pictorus apps to dedicated embedded processors, but for Open Beta we're limiting to computers sporting Linux operating systems, such a Jetson Nano, Beaglebone, or RaspberryPi.
In a previous blog post, we highlighted how to register a new device with Pictorus. Once we register our device, it can automatically sync software updates as we make changes from the browser. For now, we will have to manage our Python face detector script locally on the Pi, and manually run it when we want to test the robot. Eventually Pictorus will help us manage "ride-along" scripts like this, but for Beta we'll need to manually edit it on our Pi.
The User Datagram Protocol (UDP) in Pictorus
UDP is a popular communication protocol because it is easy to implement and has very little overhead. Simply put, you bind to a network address and then blindly send data packets to that address as you please. Unlike its heavier-weight cousin TCP, there are no handshakes or acknowledgments involved, making it easy to get started, but as a result, packets can be lost, or potentially arrive out of order.
When networking issues are a significant consideration (as is the case sending data over the internet or other large networks), UDP is unreliable and discouraged. But if you're just sending data between two applications on the same computer, and packet ordering isn't critical, UDP is usually fine.
Since we just need periodic telemetry to drive this robot, we'll use UDP. We'll send data frequently enough that losing a packet here or there is no big deal, and the Pictorus low-level controller will be capable of steering the robot safely during (rare) packet losses.
Pictorus makes UDP comms really simple. You just add UDP Receive or UDP Send blocks to your app, specify their addresses and ports, and connect them to signals you wish to transmit or process.
Tracking Faces using OpenCV and Python
The OpenCV project is immensely popular within the computer vision community due to its ease of use and powerful underlying algorithms. There are a lot of great tutorials out there diving into the nitty gritty details of how each algorithm works under the hood, and what knobs exist for fine tuning for those interested.
We'll focus this blog post instead on implementing a simple solution for face tracking using the cv2.CascadeClassifier object, assuming the reader is familiar with how they work, and will show how to send commands to a Pictorus app running on the same network.
To setup a face tracker and video camera objects, as well as the UDP port to broadcast commands, our script starts off like so:
# Setup the video stream from the first camera registered with the OS
camera = cv2.VideoCapture(1)
cv2.startWindowThread()

# Setup the face detector
classifier_file = "classifiers/haarcascade_frontalface_alt.xml"
face_detector = cv2.CascadeClassifier(classifier_file)

# Set up UDP transmitter
udp_address = "127.0.0.1"
udp_port = 34250  # Motor controller will listen here for our messages
udp_client = socket.socket(family=socket.AF_INET, type=socket.SOCK_DGRAM)

while True:

    _, raw_frame = camera.read()
    frame = cv2.resize(raw_frame, (640, 480))
    gray = cv2.cvtColor(frame, cv2.COLOR_RGB2GRAY)

    faces = face_detector.detectMultiScale3(
        gray,
        scaleFactor=1.1,
        minNeighbors=5,
        minSize=(20, 20),
        flags=cv2.CASCADE_SCALE_IMAGE,
        outputRejectLevels=True,
    )
This will connect to the camera, stream video, and inspect each frame for pixels resembling human faces in portrait (frontal view), using the Harr Cascade technique.
Now we need to decide what commands to send to our Pictorus motor controller. For simplicity, we'll just send an (x, y) coordinate, in camera pixel space, representing where in the image we see a face. Then, the Pictorus app can steer left or right based on the x coordinate, and optionally tilt the camera based on the y coordinate (to help keep the target in view).
udp_address = "127.0.0.1"
udp_port = 34250  # Motor controller will listen here for our messages
udp_client = socket.socket(family=socket.AF_INET, type=socket.SOCK_DGRAM)

# Setup the video stream from the first camera registered with the OS
camera = cv2.VideoCapture(1)
cv2.startWindowThread()

# Setup the face detector
face_detector = cv2.CascadeClassifier("classifiers/haarcascade_frontalface_alt.xml")

while True:

    _, raw_frame = camera.read()
    frame = cv2.resize(raw_frame, (640, 480))
    gray = cv2.cvtColor(frame, cv2.COLOR_RGB2GRAY)

    faces = face_detector.detectMultiScale3(
        gray,
        scaleFactor=1.1,
        minNeighbors=5,
        minSize=(20, 20),
        flags=cv2.CASCADE_SCALE_IMAGE,
        outputRejectLevels=True,
    )

    # If nothing in view, wait for next frame and check again
    if not faces:
        continue

    # Select the first face to target
    box, _, _ = faces[0]

    # Get corners and dimensions of the target rectangle, and draw it
    x, y, w, h = box
    cv2.rectangle(frame, (x, y), (x + w, y + h), (0, 255, 255), 1)

    # Compute center coordinates of the target
    target_x = x + w / 2
    target_y = y + h / 2

    message = json.dumps({
        "target_x": float(tracker.best_track.x),
        "target_y": float(tracker.best_track.y),
    }).encode()
    # Print the message so we can see in terminal
    print(message)
    udp_client.sendto(message, (udp_address, udp_port))
This super basic implementation will only send a UDP message if we see a face in the video stream. We'll select the first face we see, and send the center of the rectangle as the coordinate. We can improve this algorithm later; for now this should be sufficient to start moving our robot around. We'll pack the target coordinate into a json object and transmit to our listener.
Steering a wheeled robot in Pictorus
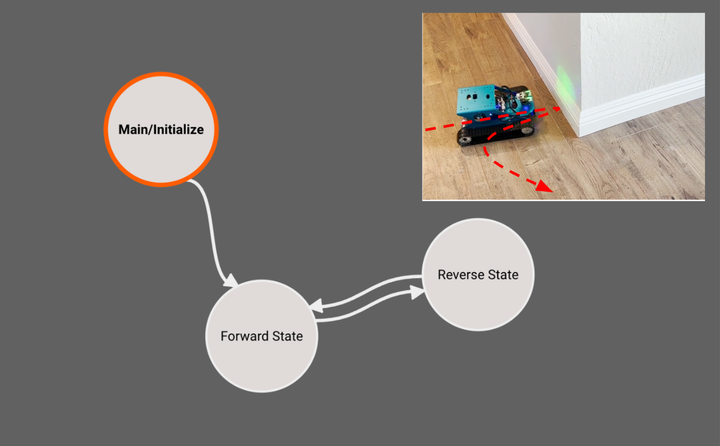
In an earlier blog post, we demonstrated how to control a Yahboom G1 Tank using an ultrasonic range finder and PWM wheel commands to autonomously navigate a room similarly to an early Roomba. This time, we're ditching the rangefinder, and upgrading our camera to an Astra Pro Plus, which sends us both a high resolution video stream, and could later on send us a depth field.
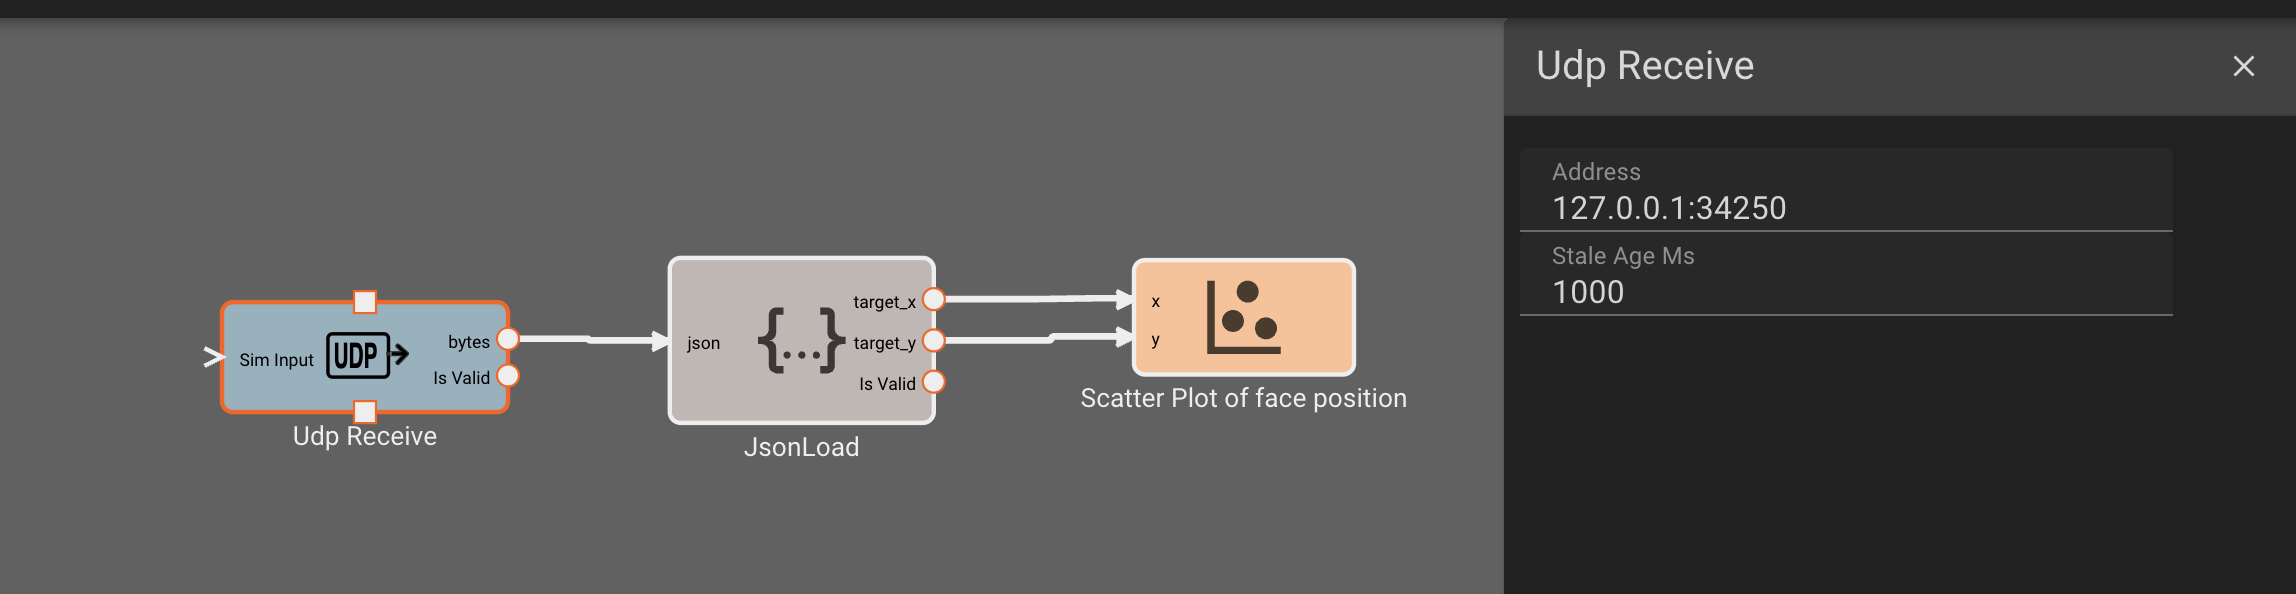
First we'll add in the UDP Receive block, to listen for messages. We simply specify the address and port and we're good to start receiving data!
Next we need to connect some blocks to parse the incoming UDP messages. All data sent between computers is inherently just bytes data. Pictorus provides deserialization blocks which allow us to parse those bytes into the numeric values we need for downstream computation. Since we know this data is being packaged as a json structure, we use a JsonLoad block to extract the information we need, specifying which keys in the structure we care about. We also need to specify if the key/value pair represent numeric data, or more bytes that need further unpacking. In our case, the target_x and target_y keys are float values, so no further parsing blocks are needed.
Before proceeding to implement the motor controller, let's first verify we are receiving data as we'd expect. We can place an Inspect block in our workspace, and connect the UDP Receive block to it. Inspect blocks are great for looking at the actual bytes being received by a block. Let's also add a Scatter Plot blocks, and connect the target_x and target_y signals to them, to verify we're parsing the coordinates correctly into numeric values. Lastly, we can plot the isValid output of the UDP block to get a time series perspective on data validity.
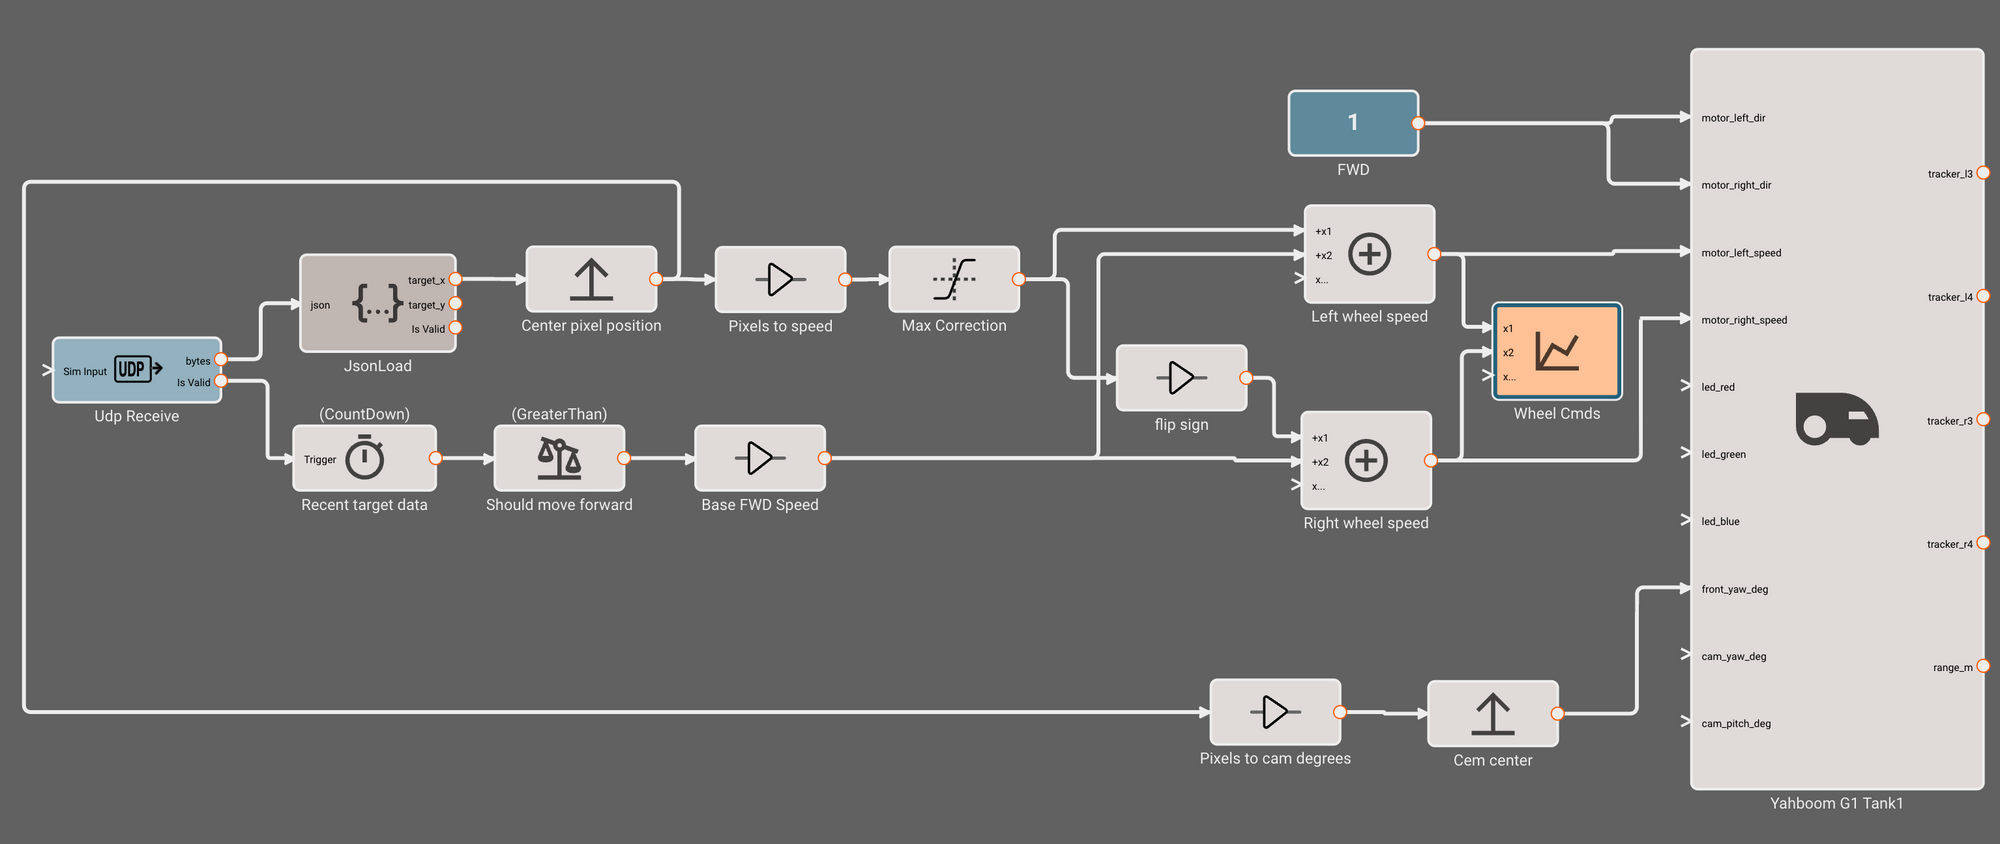
We verify the data flow into our motor controller looks solid, so now let's diagram the controller! This doesn't have to be rocket science - we'll simply drive to the left or right based on how far from center the target_x value is.
We can do this by commanding a differential to each wheel, proportionally more powerful to the wheel opposite the direction we desire to travel. So if the target face is basically in the middle of the image, both wheels will command forward at equal speed. But if the face is to the right of center, for example, we'll command the left wheel a bit more power.
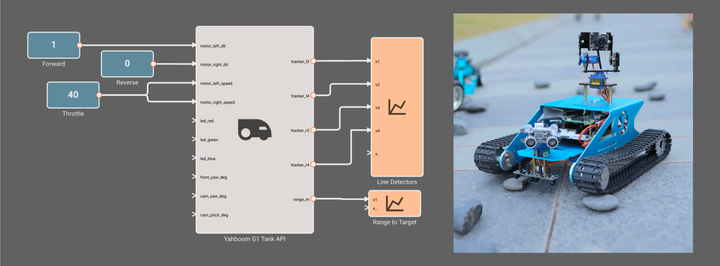
In the app below, we use a Bias block to subtract 320 (the center pixel position) from target_x. This shift means positive target_x values will mean face is to the right, and negative values means face is to the left. We use a Gain block to introduce a "Pixels to Motor speed" scale factor, and then use a Saturation block to limit the motor speed correction to +/- 10%. To create a differential, we flip the sign of the correction for the right wheel. We add these corrections to our Base FWD Speed of 20%, which will only be commanded when valid UDP data has been recieved in the last 1 second (computed using a Timer block attached to the isValid port of the UDP receiver). Finally, these speed commands are sent to our Yahboom G1 tank API component from last time. Just for fun, we also command the forward yaw servo (upon which our defunct rangefinder sits) toward the target so we can see the robot "look" at the target:
We can re-use the Yahboom G1 Tank Component from the last blog post, which presents a nice API for issuing steering commands to the left and right wheels. And now we're ready to deploy and test!
Putting it all together
To test our controller, we start by commanding the Pictorus app to run from our browser, and running the Python script manually from the RaspPi command line:
Once these start running, we should begin detecting faces and sending commands to the motor controller to execute. Remember that we can stop the motor controller at any time from our browser from the upper left control panel.
And away we go!
Next Steps
The implementation above is super bare bones, and leaves a lot of room for improvement. On the face detector front, it might make sense to track targets between frames, and to create a consistent steering target when the detector misses targets. The face detector we've selected also assigns confidences to each detection, which could allow us to ignore low quality targets. We also aren't handling the case of multiple faces.
On the motor controller side, we could make a few obvious improvements as well. We could introduce smarter steering control between detections, in case we briefly lose the target. We could also pivot the camera servo to point in the direction of the target using its y-coordinate. This way we'd better track targets moving just out of view.
We could also get our rangefinder back in action, allowing us to avoid obstacles in our way. This could involve sending UDP data two ways, where the Pictorus controller sends the rangefinder distances to the Python script, which then uses that information to perform more advanced motion planning. A blog post for another day!
If you're interested in experimenting with the controllers discussed here, all the components demonstrated in our blog are available for free within the in-app public marketplace. Open Beta is free and you can sign up on our website!